


Motivation
A Webhook as a concept was introduced by Jeff Lindsay in 2007. The underlying idea was about extending to the web the concept of a pipe in the UNIX operating system, namely the idea of composition of commands in the Command Line Interface (CLI). What would be the equivalent for the web, where the composition would be done from machine to machine, instead of a human adding stages in the pipe, i.e., composing commands in CLI?
The idea needs to be translated into a client and server context, which is the web. When a server performs a certain action, the pipeline is built by a client running on the server side that sends information to another server. Then that server can also have a client to compose another request to another server and so on, with as many stages in the pipeline as desired.
In a nutshell, the pipeline is built by clients that are under the control of each server that intervenes in a given pipeline.
UP42 recently introduced webhooks, thus enabling developers and geospatial analysts to create their own pipelines, by composing the webhook requests with other services in that pipeline. For example, you may now get an email notification when an order is delivered to your UP42 User Storage. You can then add other actions, such as running a workflow using the imagery delivered from that order. Webhooks open up a multitude of options for using UP42 as part of complex machine-to-machine pipelines.
This is the first article in a series of two that explores webhooks to a considerable depth. In this article, we will be using a hosted service, Pipedream, to run Python code snippets that handle the incoming requests via UP42 webhooks. The goal is to make webhooks usable without requiring you to run a server on your own. Instead, we rely on Pipedream and leverage its multiple integrations. Our example uses a simple email notification, but you can also build integrations with Telegram, Slack, Discord, Github, AWS, Google Cloud, etc. The full list of available integrations is here. Therefore you can have, in principle, pipelines that are as long and as complex as you desire.
We also intend to make webhooks accessible to data scientists and geospatial analysts, who are often less familiar with server side programming.
The intended audience for this article ranges from geospatial analysts to developers, including data scientists. The code snippets are quite simple and rely solely on moderate usage of regular expressions and some cryptographic functions to validate the incoming request (more on that below).
As a final note for what motivation is concerned, the term webhook, specifically the hook part, originates from programming, where a hook is a technique to alter the behavior of a system or an application when certain events occur.
Emacs and its extensibility using Emacs Lisp has defined hooks to be variables that hold lists of functions that are invoked upon certain events. For example, when editing a markdown file, the hook markdown-mode-hook is evaluated. This hook alters the behavior of normal editing of markdown files. Similarly, a webhook alters the behavior of a server running on the web. In our case, whenever a job and/or an order changes status, a hook is invoked that makes the request to the receiving server.
(setq markdown-mode-hook
    #'(lambda () ; changing the spelling aid dictionary to US English
(ispell-change-dictionary "american")))
Requirements
-
Reasonable fluency with programming in Python 3.
-
A Pipedream account: there are several ways to create an account. One of the easiest options is to authorize the application in your Github account. Then your github identity is used throughout Pipedream.
-
You will also need an UP42 account.
Creating an UP42 account is free If you sign up as an individual, you can only access non-commercial data out of the box. If you sign up as an organization, you will immediately have access to commercial data. Individuals can, eventually, also get access to commercial data, but you will need to explicitly request this access on the console.
Problem statement
We would like to get a notification by email whenever a job and/or order is completed. This completion can be successful, i.e., the job ran successfully and/or an order was delivered, or also unsuccessful, i.e., the job failed or the order failed permanently. We want all other statuses to be ignored, i.e., no email should be sent for these.
We also need to address the following security concerns:
-
Authenticate the incoming request to make sure it is really coming from UP42 and to ensure that no tampering of the request has happened during transit.
-
Reduce or eliminate the possibility of replay attacks.
-
Use as little code as possible. The code snippets we use are under 40 lines of code. The snippet for handling orders is basically duplicated from the one used to handle jobs. They differ only by a few strings, which are specific for jobs and orders.
As stated above we want to achieve all of this without having to deal with server side programming.
Creating and using webhooks from 0 to 100 (gently)
What will we use webhooks for?
. We want to create a pipeline of actions to be performed whenever a job and/or an order in the UP42 platform terminates. In this case, the action is sending a simple email with a summary of what happened, namely, the job/order IDs and the final statuses. The email message is templated so that all the information that was sent via the webhook can be explicitly described in the message.
The UP42 webhook implementation
The current UP42 webhook implementation is a first step in the direction of enabling developers to build complex web-based workflows (pipelines) with UP42. We can make improvements, like finer-grained event types and adding nonces to the requests. What we have right now is already quite good and will get you very far in terms of what can be done.
There are currently two types of events that invoke webhooks. Shown below is the JSON document from the UP42 API describing these events:
{
 "data":  [
 {
 "name":  "job.status",
 "title":  "Job Status update",
 "category":  "job",
 "description":  "Triggered when a job (or related task) status is updated."
 },
 {
 "name":  "order.status",
 "title":  "Order Status update",
 "category":  "orders",
 "description":  "Triggered when order status is updated."
 }
 ]
}
We can see that:
-
For jobs: whenever a task status in the job or the job status itself updates, we get a notification.
-
For orders: whenever an order status updates, we get a notification.
These refer to any job and/or order under a given workspace. A workspace is the context where webhooks reside. Which means that for an organization account, each user can have their own set of webhooks.
Currently, the finer granularity we can have is order and job. It is not possible on UP42 to specify a webhook that acts on a specific order or job. However, you can do that on your side: filter the incoming requests and act only on those that are of interest to you. For example, after placing an order, you can use that order ID to filter incoming requests and act only on that order and not on any other orders you may have placed. The same applies for jobs: you can filter by job ID.
Taking advantage of webhooks without running a server
As stated above, we want to use webhooks without running a server. To do that, we need to rely on hosted services. There are quite a few services that provide webhooks integration. But we want a service that will allow us to run arbitrary Python code. Pipedream fits our needs. It supports scripting in Python, Javascript, Golang, and Bash. It also offers many integrations with other types of services, like chatbots, messaging applications, cloud providers, etc.
The usage of Pipedream is only for illustration purposes and is not a requirement to leverage UP42 webhooks. There are other services out there and the choice is yours. For this article, and quite likely for many applications, Pipedream's developer tier (gratis) is good enough and should be considered for both early trials of webhooks-based workflows, as well as for more definitive implementations. Per the usual disclaimer YMMV.
Validating the requests received
We need to make sure that the requests we'll receive in our Pipedream account are really coming from UP42 and have not been tampered with in transit. UP42 enables this by signing each webhook invocation (HTTP request). The signature consists of a keyed-hash message authentication code created from several message components. Although there is currently no IETF-defined standard for the signing of HTTP requests, a draft follows the standards track.
UP42's webhooks implementation follows this draft, which, hopefully, will make the implementation standard once the draft is converted into a standard. Signing HTTP request has so far relied on vendor specific implementations, e.g., AWS, Github.
Instead of creating an UP42-specific way of signing HTTP requests, the standard (draft) is followed. That should make the implementation used to validate UP42 webhook-related requests mostly identical for validating other signed HTTP requests.
Small detour into HTTP request validation: the (upcoming) standards and UP42
The current draft, HTTP Message Signatures, defines how to sign, send the signature creation description, and the signature itself in the request headers. Let us break it down into steps.
How the signature is created
To create the signature, we'll use an SHA-2 with 256 bits hashes (SHA256) based HMAC. The draft states in Section 3.3, "Signature Algorithm Methods,"
"HTTP Message signatures MAY use any cryptographic digital signature or MAC method that is appropriate for the key material, environment, and needs of the signer and verifier."
The signing algorithm is sent in the Signature-Input HTTP Header Field.
Here is an example field sent in an UP42 webhook request:
Signature-Input: up42-sig=("content-digest");keyid="secret";alg=hmac-sha256;created=1649955772This tells us that:
-
The signature is called
up42-sigand is built from the Content-Digest field ("content-digest"). -
It uses an SHA256 based HMAC for the signing.
-
It was created at the Unix time 1649955772.
-
The key used for the HMAC is called secret.
We need the Content-Digest field.
Content-Digest: SHA-256=:YgBKluuWPVMUnIw4sRikctZwAoXBBKaFKwvdUgrxANg=:
It is a Base64 encoded cryptographic hash of the message body (content). The hashing algorithm used is an SHA-2 with 256 bit hashes.
Getting the computed signature
In order to validate the request, we need to compare the HMAC we create on our side with the one sent in the request. That is in the Signature field. Here is an example:
Signature: up42-sig=nnP6Cj3juj0gU6PRBYSzhmuPywSzD9waycLbCyc1RZU=
We have the signature identifier up42-sig and its value, which is Base64 encoded.
Now we have all we need to validate the request securely.
Validating the request
To validate the request, we do the following operation in pseudo-code:
secure_compare(base64_encode(hmac_sha256(<secret>, <content-digest>)), <signature>)
If the secure_compare function returns true, the request is valid. If
not (returns false), it is invalid. We should exit (in Python terms,
raise an Exception), signaling the reason why we did so. I.e., we cannot
validate the request based on the given signature.
Assuming our secret is the sentence:
the quick fox jumped over the lazy dog
Here we apply the above sentence below:
secure_compare(base64_encode(hmac_sha256("The quick fox jumped over the lazy dog", "SHA-256=:YgBKluuWPVMUnIw4sRikctZwAoXBBKaFKwvdUgrxANg=:"), "nnP6Cj3juj0gU6PRBYSzhmuPywSzD9waycLbCyc1RZU=")
Here secure_compare is the secure string
comparison
to prevent timing
attacks on the HMAC.
Secure string comparison uses bitwise operations to do the comparison.
Creating and testing webhooks on UP42
To create webhooks in UP42, we'll use the console. This allows us to create, update, and delete webhooks, as well as test them.
Pipedream-based webhook automation
In Pipedream, you can build automation workflows that use webhooks as events to trigger the steps in the workflow.
These steps can be arbitrary Python code. We rely on this functionality for our usage of the UP42 webhooks.
Pipedream provides a CLI pd, ideally we would be able to upload our code snippets. Unfortunately, at the moment, such a functionality is not possible as documented in an open Github issue.
So we have to copy & paste the code into an enhanced text area that provides code auto-completion. There are plans for allowing a git similar type of approach to your code snippets.
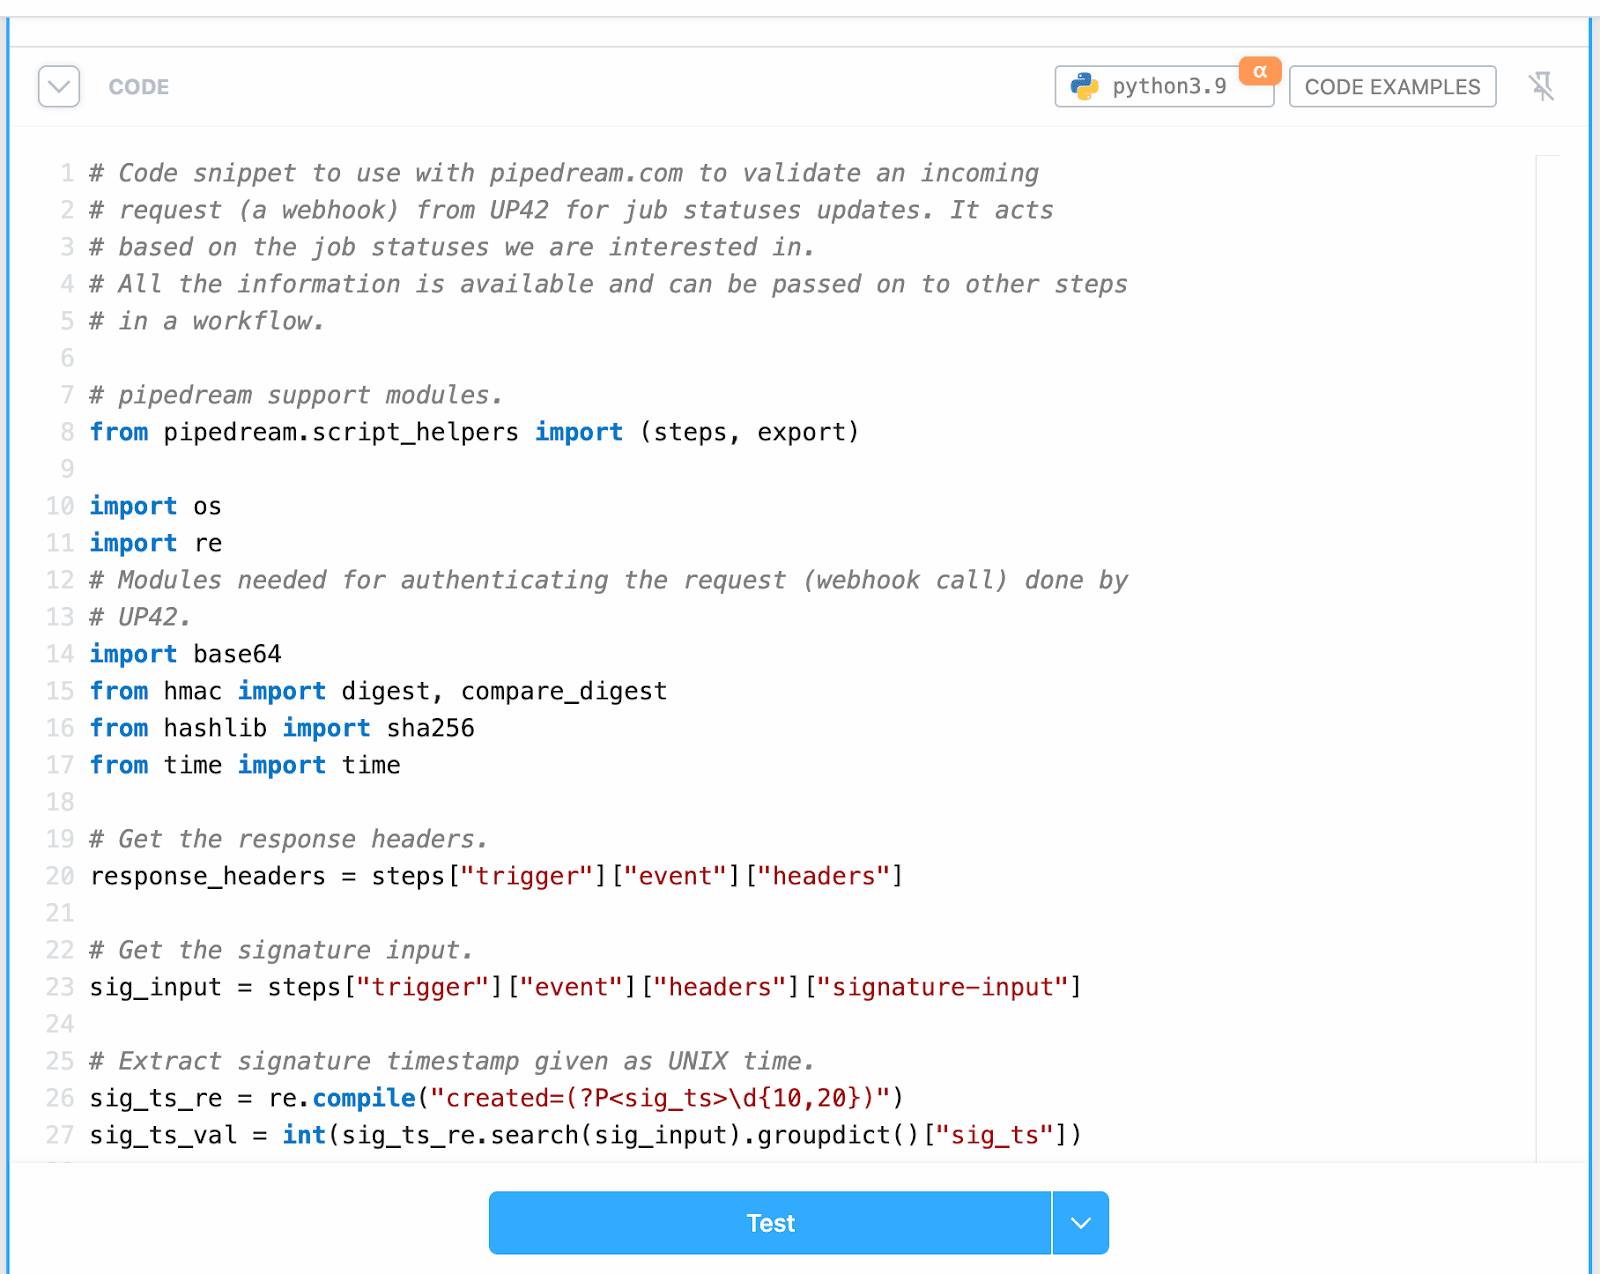
A code snippet to validate a request
We need two code snippets: one to handle job status-related webhooks, and another one to handle order status-related webhooks. They differ by just a few strings. Let us start with the snippets to handle job status-related webhooks.
# Here's the code snippet to use with Pipedream.com to validate an
# incoming request (a webhook) from UP42 for job statuses updates. It acts
# based on the job statuses we are interested in. All the information is
# available and can be passed on to other steps in a workflow.

# pipedream support modules.
from pipedream.script_helpers import (steps, export)

import os
import re
# Modules needed for authenticating the request (webhook call) done by
# UP42.
import base64
from hmac import digest, compare_digest
from hashlib import sha256
from time import time

# Get the response headers.
response_headers = steps["trigger"]["event"]["headers"]

# Get the signature input.
sig_input = steps["trigger"]["event"]["headers"]["signature-input"]

# Extract signature timestamp given as UNIX time.
sig_ts_re = re.compile("created=(?P<sig_ts>\d{10,20})")
sig_ts_val = int(sig_ts_re.search(sig_input).groupdict()["sig_ts"])

# Get current date as UNIX time.
current_ts = int(time())

# Reduce the possibility of replay attacks by dropping any incoming request that
# is older than 5 minutes (300 seconds).
assert sig_ts_val <= current_ts and abs(current_ts - sig_ts_val) < 300, f"Request time skew is too large."

# Get the signature value given in the response headers.
sig_header_value = steps["trigger"]["event"]["headers"]["signature"]
sig_header_value = bytes(sig_header_value.split("=", 1)[1], "UTF-8")

# Extract how the signature is generated.
# 1. Look for the up42-sig element in the header.
field_re = re.compile("up42-sig=\((?P<sig_list>.*)\);.*")
sig_val = field_re.search(sig_input).groupdict()["sig_list"]
# 2. Extract the list of signature input components.
list_re = re.compile("[^\"\s]+")
sig_inputs = re.findall(list_re, sig_val)

# Validate the received request by validating the signature.
# 1. First get each signature component concatenated in a single
# string.
sig_str = "".join(response_headers[i] for i in sig_inputs)
# 2. Compute the HMAC for this string.
secret = os.environ["up42_webhook_secret"] # get the secret
# Compute the signature based on the response headers.
computed_sig = base64.b64encode(digest(bytes(secret, "UTF-8"),
                                       bytes(sig_str, "UTF-8"),
                                       sha256))

# Raise an Assertion error if the signature is invalid. Exits the
# workflow. I.e., no existing subsequent steps will be executed.
assert compare_digest(sig_header_value, computed_sig), "Cannot authenticate incoming HTTP request."

# Filter the response based on the job status we are interested in.
def filter_response_job_status(current_status: str,
                               interesting_statuses: list[str]) -> bool:
    if os.environ.get("is_test") == "yes":
        return True
    assert current_status in interesting_statuses, f"Ignoring request. Ignored status {current_status}."

# Get the current event type.
current_event_type = steps["trigger"]["event"]["body"]["event"]

# Filter on the event type. We are only interested in events of type job.status.
assert current_event_type == "job.status", f"Event type mismatch: {current_event_type}."

# The list of statuses that we are interested in.
notifiable_statuses = ["ERROR", "FAILED", "CANCELLED", "SUCCEEDED"]

# Filter the response based on the statuses that we are interested in.
filter_response_job_status(steps["trigger"]["event"]["body"]["body"]["status"], notifiable_statuses)
Let us now go over the above code step-by-step.
from pipedream.script_helpers import (steps, export)This line imports the Pipedream Python module. If we look at the code, it just relies on the environment to get the steps of the workflow, where steps represent stages in a workflow.
- We then import the Python modules we need to handle the HTTP request signature validation.
response_headers = steps["trigger"]["event"]["headers"]-
The incoming request is an event handled by a webhook trigger. The request headers and body are serialized into a dictionary (remember that it comes from the
os.environdictionary),steps["trigger"]["event"]. -
We look at the header
Signature-Inputfirst. We want to determine when and how the signature is generated. -
First we get the signature timestamp, to make sure it is recent enough to reduce the surface for replay attacks.
-
The timestamp is extracted via a named group capture, where the output is stored within the
sig_ts_valvariable as an integer.
assert sig_ts_val <= current_ts and abs(current_ts - sig_ts_val) < 300, f"Request time skew is too large."- We compare that timestamp with the current timestamp and raise an AssertionError exception and exit the workflow if the time skew is larger than 5 minutes (300 seconds).
sig_header_value = steps["trigger"]["event"]["headers"]["signature"]- Extract the request signature as a bytes literal
encoded in UTF-8 and store it in the
sig_header_valuevariable.
field_re = re.compile("up42-sig=\((?P<sig_list>.*)\);.*")- With another named capture group, we extract the signature component
list, which is stored within the
sig_valvariable.
sig_str = "".join(response_headers[i] for i in sig_inputs)- Iterate through the list of signature components and concatenate
each request header field value, in our case it is only
"content-digest".
secret = os.environ["up42_webhook_secret"]- Get the secret from the user-defined environment variable secret in Pipedream.
computed_sig = base64.b64encode(digest(bytes(secret, "UTF-8"), bytes(sig_str, "UTF-8"), sha256))-
Compute the signature using the SHA-256 HMAC and compare it securely (see above to preempt timing attacks) with the signature sent in the request header. If they do not match, raise an
AssertionErrorexception and exit the workflow. -
Next, we want to filter the job statuses we want to get notified about. For that, we define a predicate function
filter_response_job_status.
notifiable_statuses = ["ERROR", "FAILED", "CANCELLED", "SUCCEEDED"]-
This list represents the jobs statuses that we are interested in.
-
Raise an
AssertionErrorexception and exit the workflow if the status update is not in thenotifiable_statuseslist. -
Proceed to the next step if it is. The next step will notify us by email if any of the job status updates we are interested in occur.
-
There is an additional environment variable named
is_test, that if set to "yes", will cause the functionfilter_response_job_statusto return True. This is useful for testing the case when we want to run the full workflow regardless of the status. We will see further below that webhooks can be easily tested without requiring any jobs run or orders placed.
The code snippet for handling order-related webhooks is similar to the one for handling job-related webhooks. The difference relies on the list of interesting statuses. The list below refers to order statuses.
notifiable_statuses = ["FULFILLED"]We only want to get notified when an order is fulfilled.
Here is an order-related webhook payload example:
{
  "orderId": "0977e806-d10d-4c6f-860f-37505e39eac2",
  "orderType": "ARCHIVE",
  "dataHostName": "oneatlas",
  "status": "FULFILLED",
  "statusIsFinal": true
}
Getting notified by email when something of interest happens
Pipedream provides a simple email-related workflow step that emails you a message in plaintext or HTML. There is a template that allows you to use values from the steps dictionary (object in Javascript) in the email subject line and message body.
Pipedream email action as a workflow step
Please note that this step is available in Javascript only, and not in Python. Therefore, if you want to do something beyond templating, like adding conditionals, you will have to work in Javascript as documented in the link above.
The email will be sent, by default, to the email address you have associated with your Pipedream account. If you want these notifications to be sent to another email address, you will need to modify the email address in your Pipedream account settings.
End-to-end notification example
We bring everything together and we will create two webhooks: one for handling job status updates and another for handling order status updates. From there, we will build our Pipedream automation workflow for email notifications.
Creating webhooks on the console
After logging into the UP42 console, you can access the webhooks tab through the dropdown menu on top right for your account.
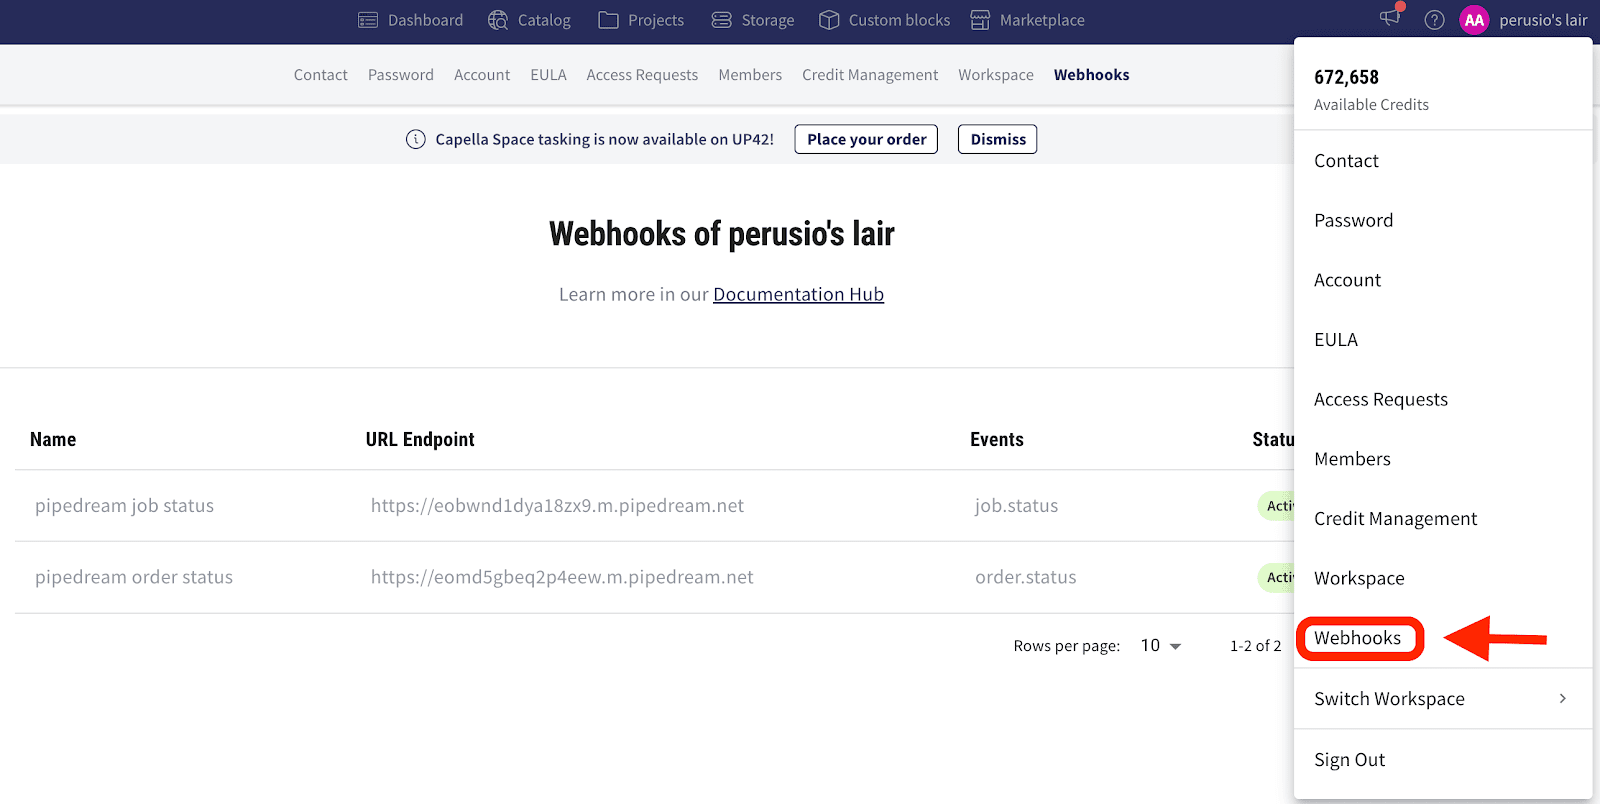
Accessing the webhooks tab in the console
Then you will need to select the Create Webhook button:
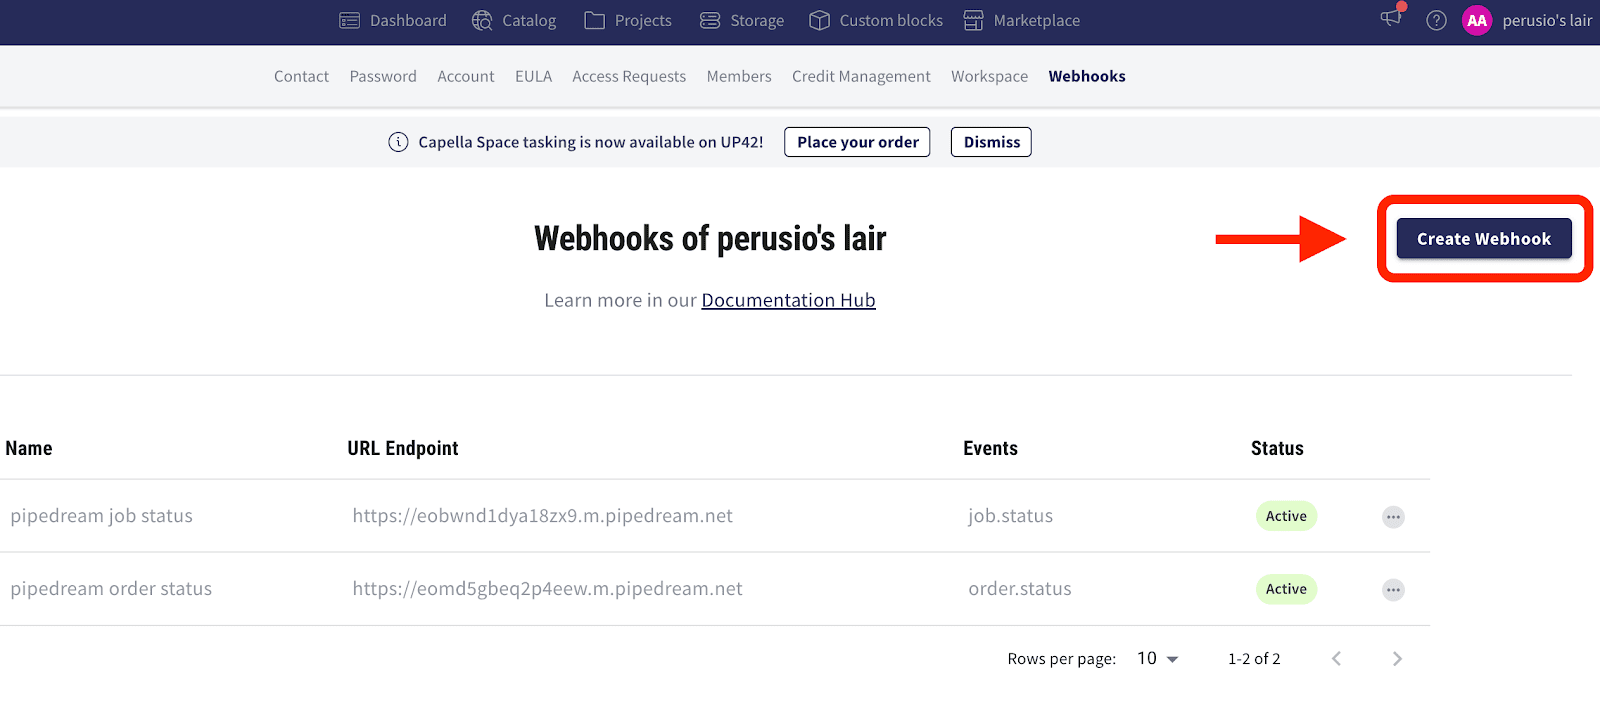
Create webhook button
This brings up a modal where you need to enter the webhook parameters:
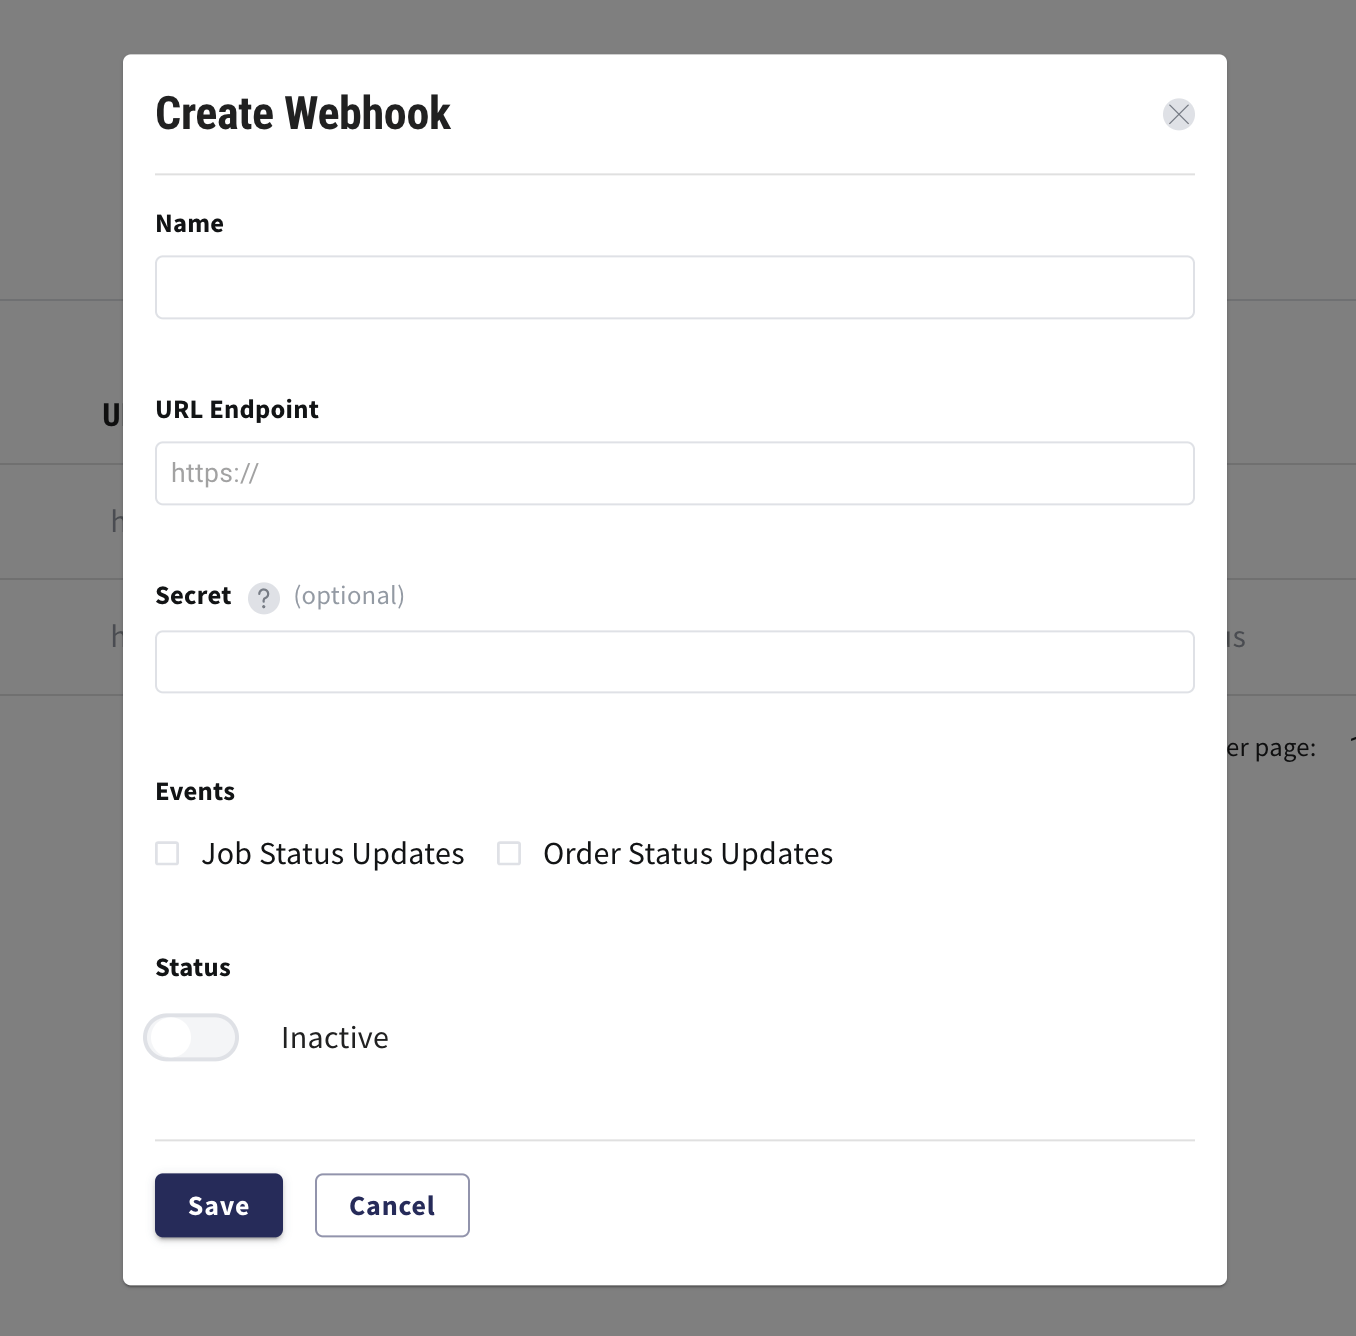
Add webhook parameters
In order to fulfill the parameters, we need to provide the Pipedream webhook with the receiving endpoint URL. So now we need to go into Pipedream and start creating our workflow. It is assumed that you have already created your account on Pipedream.

Create a Pipedream workflow
After creating the workflow, we need to add a webhook trigger for the workflow.
Add a webhook trigger to the Pipedream workflow
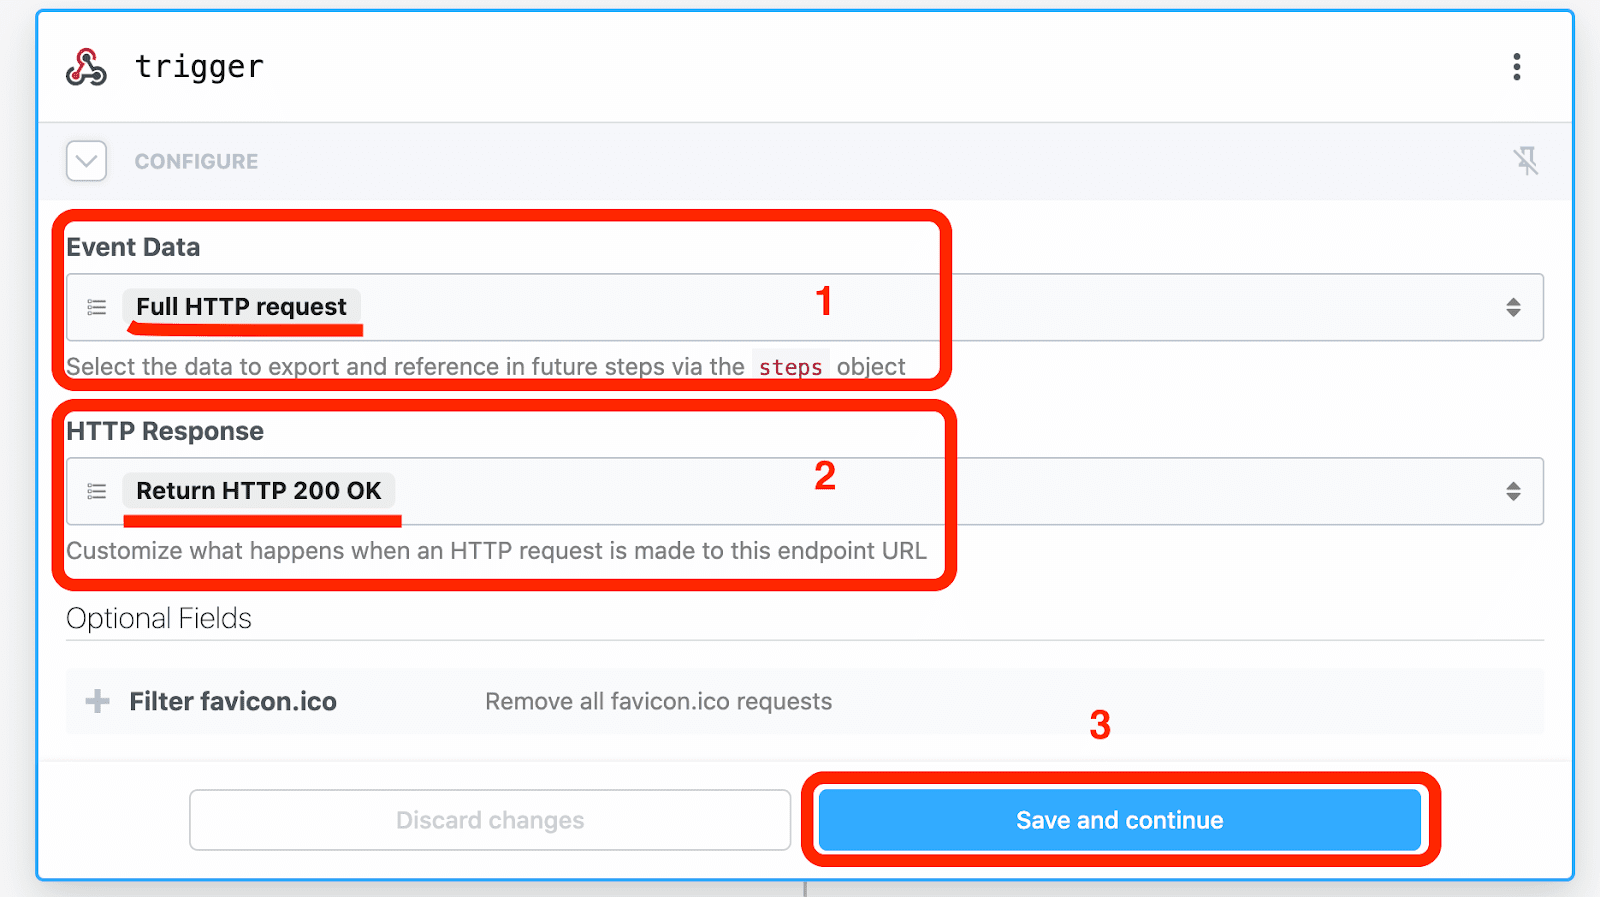
Now we need to set up the trigger. It allows for things like the returned HTTP status code, what parts of the incoming request we want to handle, and even using Javascript to add custom code. In our case, we opted for simplicity and as such we return a 200 status code (OK) and we pass down the workflow steps the full request, i.e., header fields and body.
Set up the webhook trigger
Now,we have all we need to proceed with the webhook creation in the UP42 console. We just need to copy the URL endpoint for the webhook trigger:

Copying the webhook trigger endpoint URL
Before we return to the console, let us just rename the workflow to something meaningful:
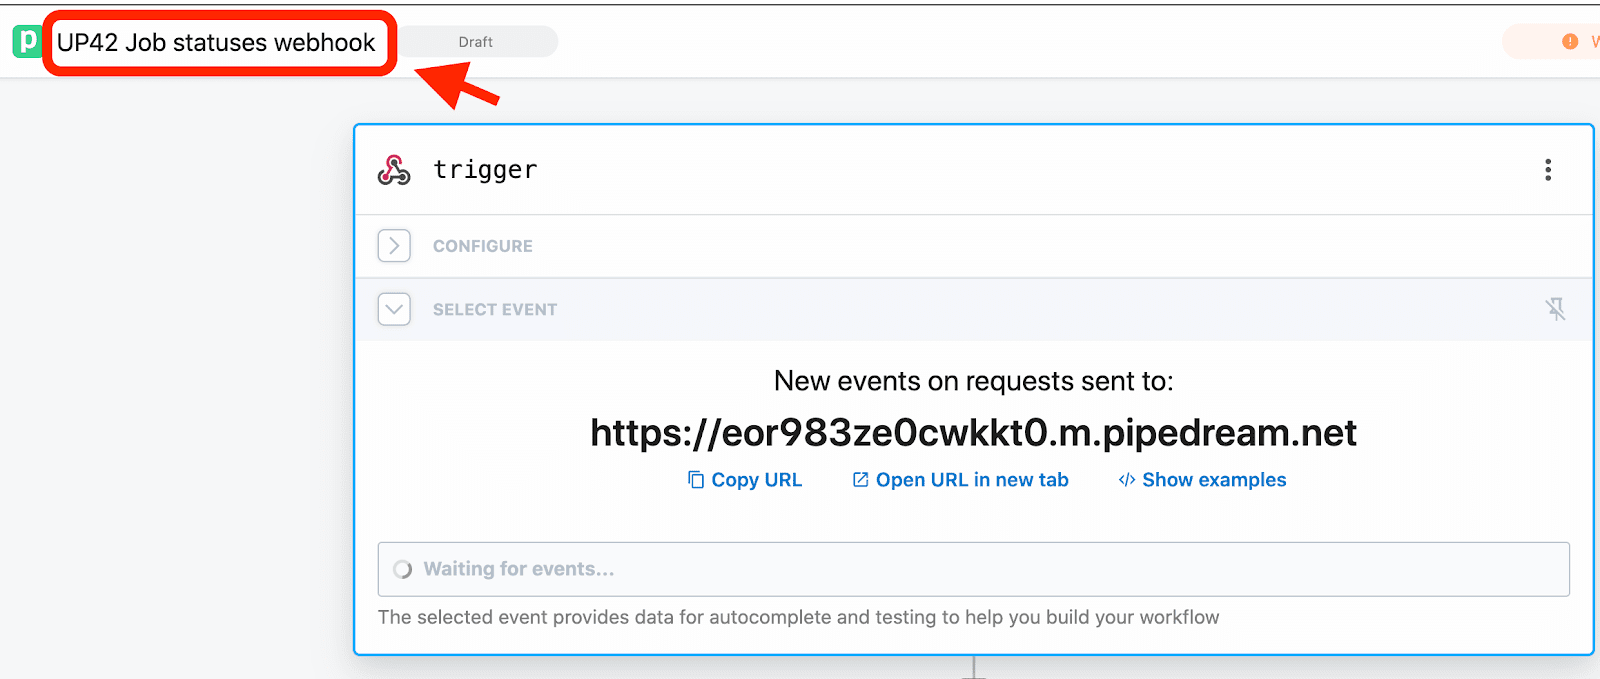
Rename the Pipedream workflow
Setting up the webhook in the UP42 console:

Set up the webhook for job statuses
The parameters are:
-
Name: email notification for job status.
-
Webhook trigger endpoint URL: https://eor983ze0cwkkt0.m.Pipedream.net.
-
Secret for signing the requests with HMAC: the quick fox jumped over the lazy dog.
-
The type of event we want to be notified about: Job Status Updates.
-
And finally, we need to activate the webhook.
At this point, everything is set up from the UP42 console side. We will proceed to add the steps for handling the webhook request, which is the snippet of Python code we discussed above, and also the step for sending the email.
Adding the step for handling the incoming request: HTTP request validation
The first thing we need to do is to add another step in the workflow. You need to add a custom code step:
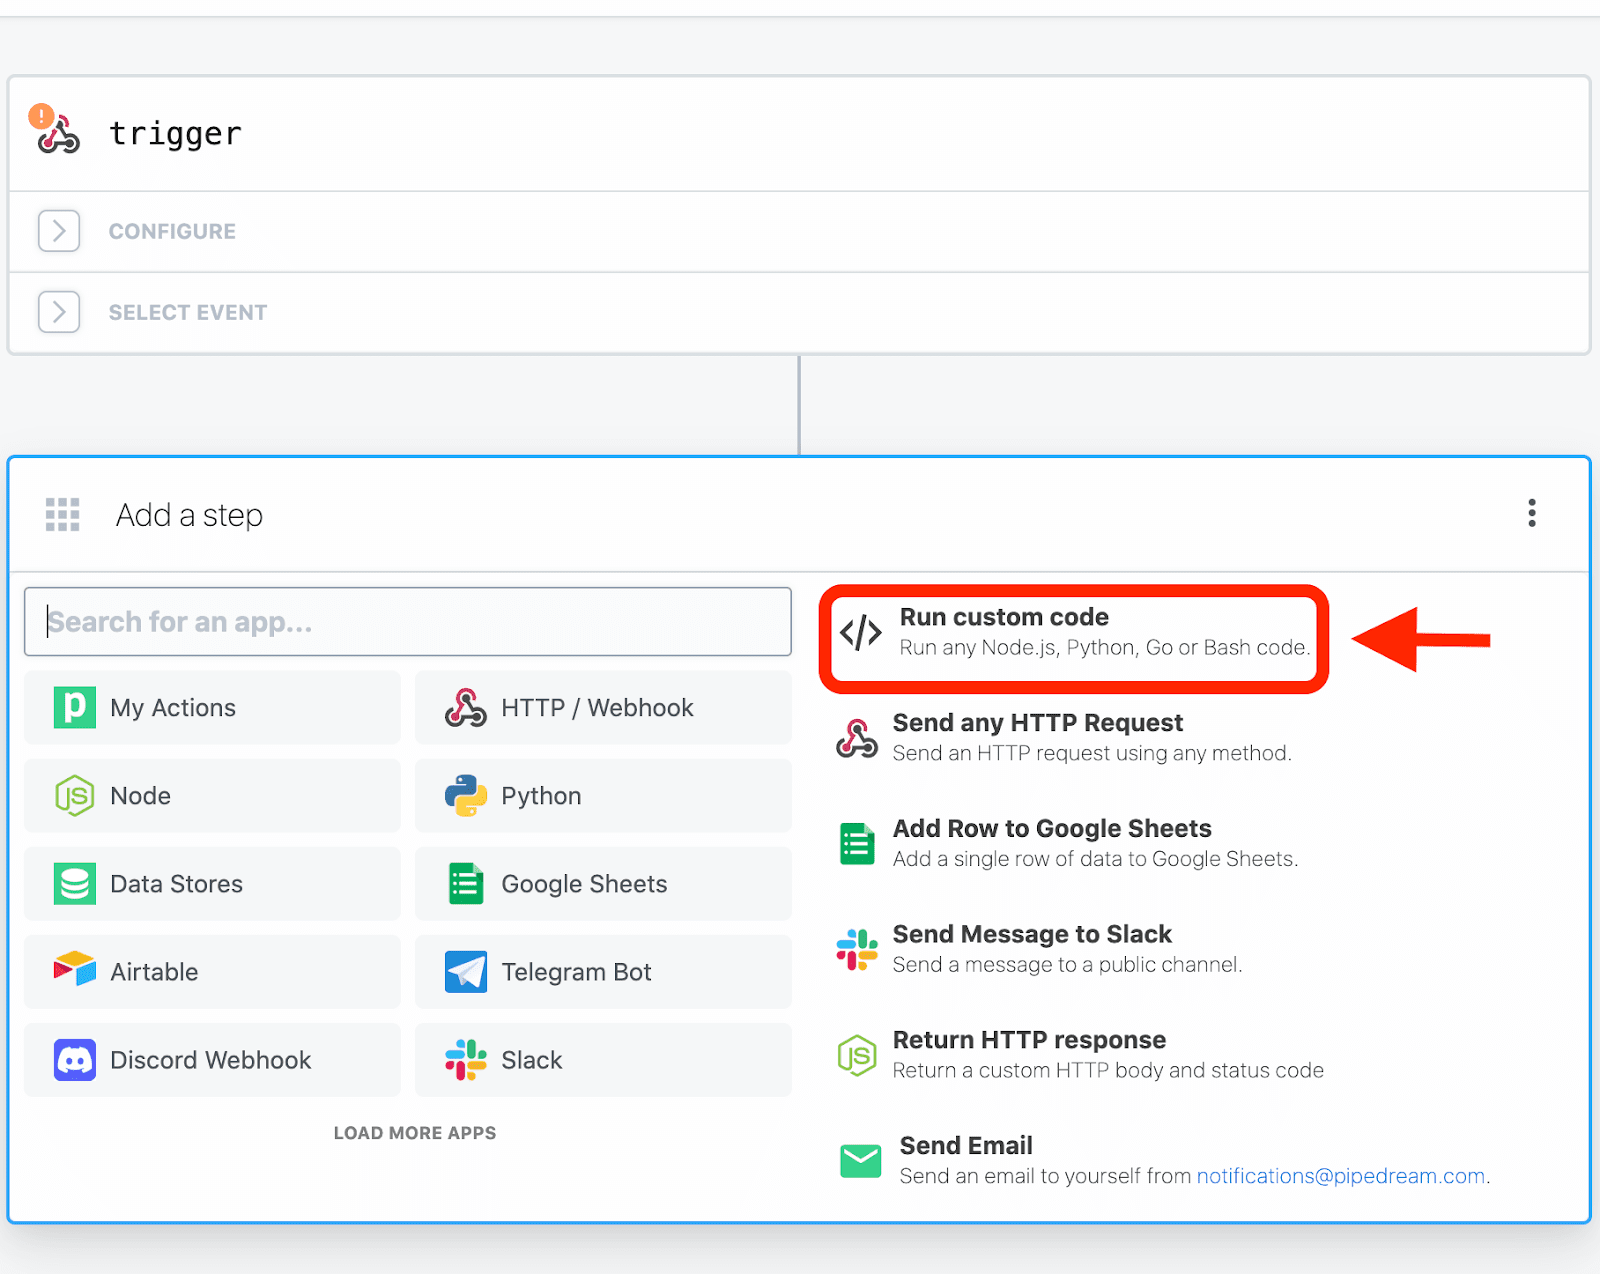
Adding a custom code step
Then you need to select Python for the custom code step:
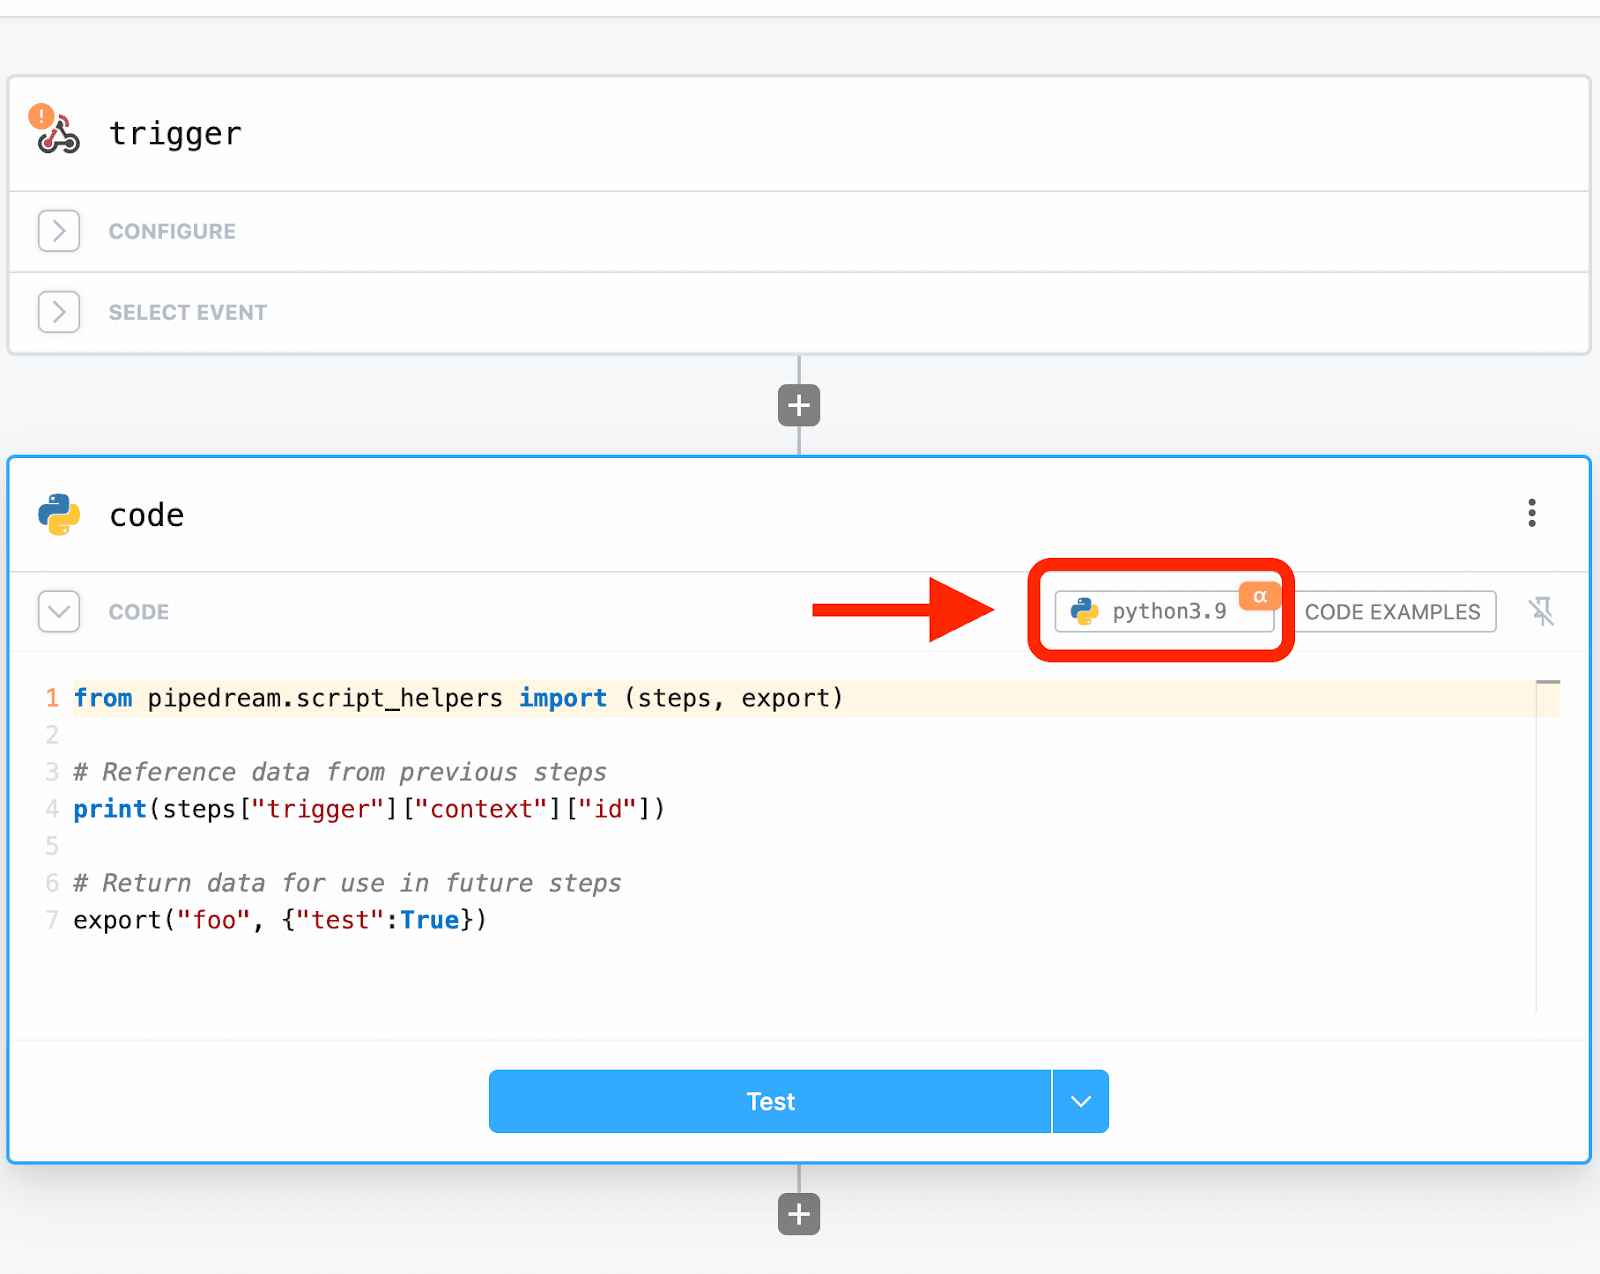
We need now to copy & paste the code snippet from the repository into the text area for the custom Python code:
Adding the custom Python code snippet
We are done with adding our custom code step.
Adding the step for sending the email
We've reached the final step in setting up the Pipedream workflow to get notified when a job status is updated to the statuses we are interested in.
First, we need to add the email me action to the workflow as a step.
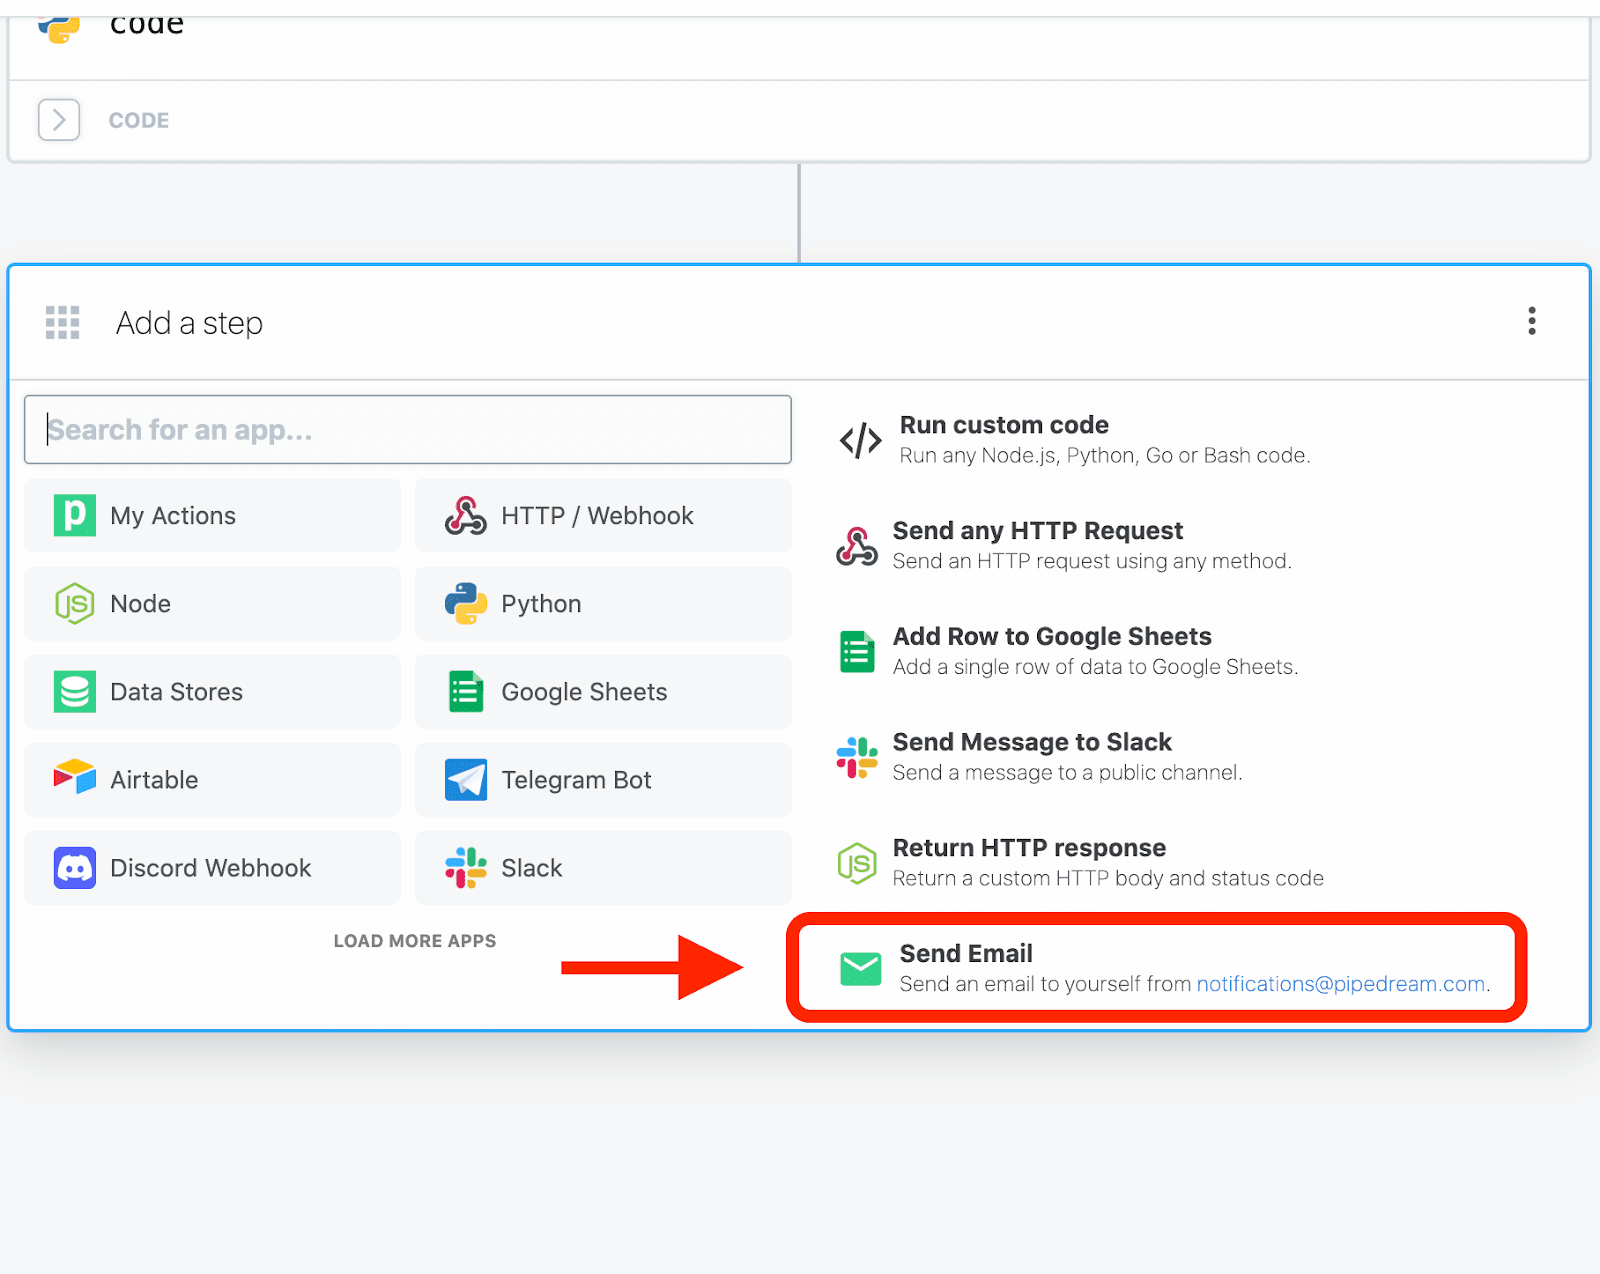
Adding an email me step to the workflow
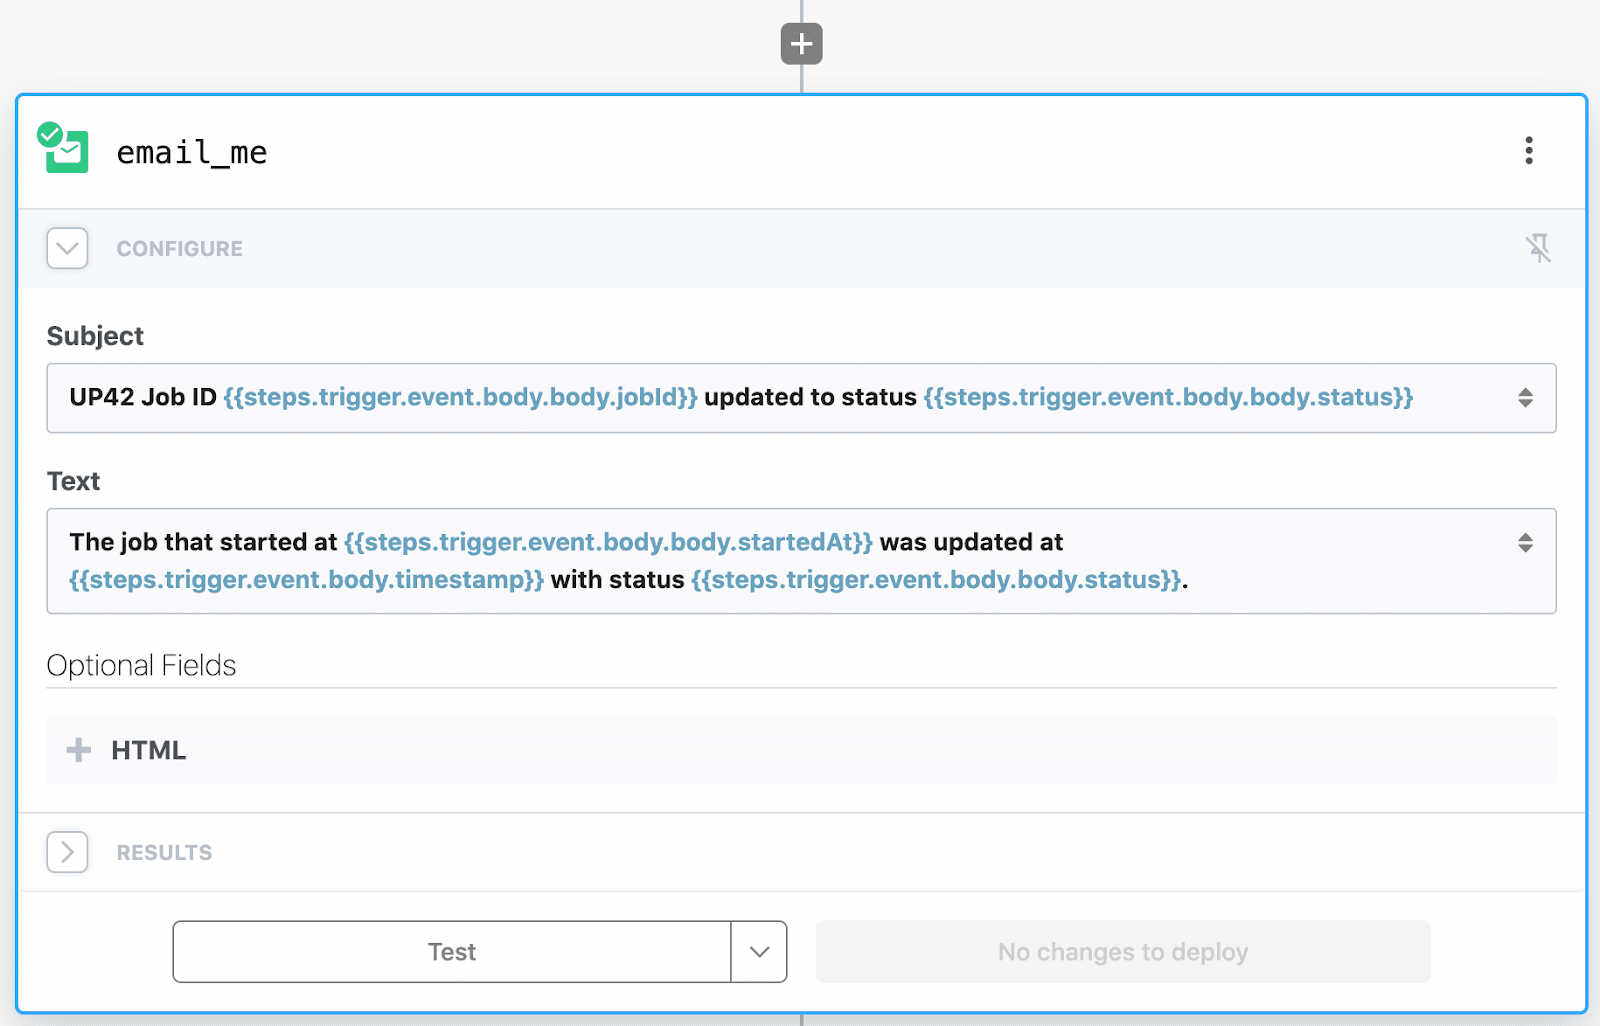
Then we need to add a subject line. You can add variables via a template and these variables are the ones available throughout the workflow in the steps object. In this case, we are interested in variables that come from the webhook payload and are related to the job status.

Adding the message subject
Similarly for the message body:
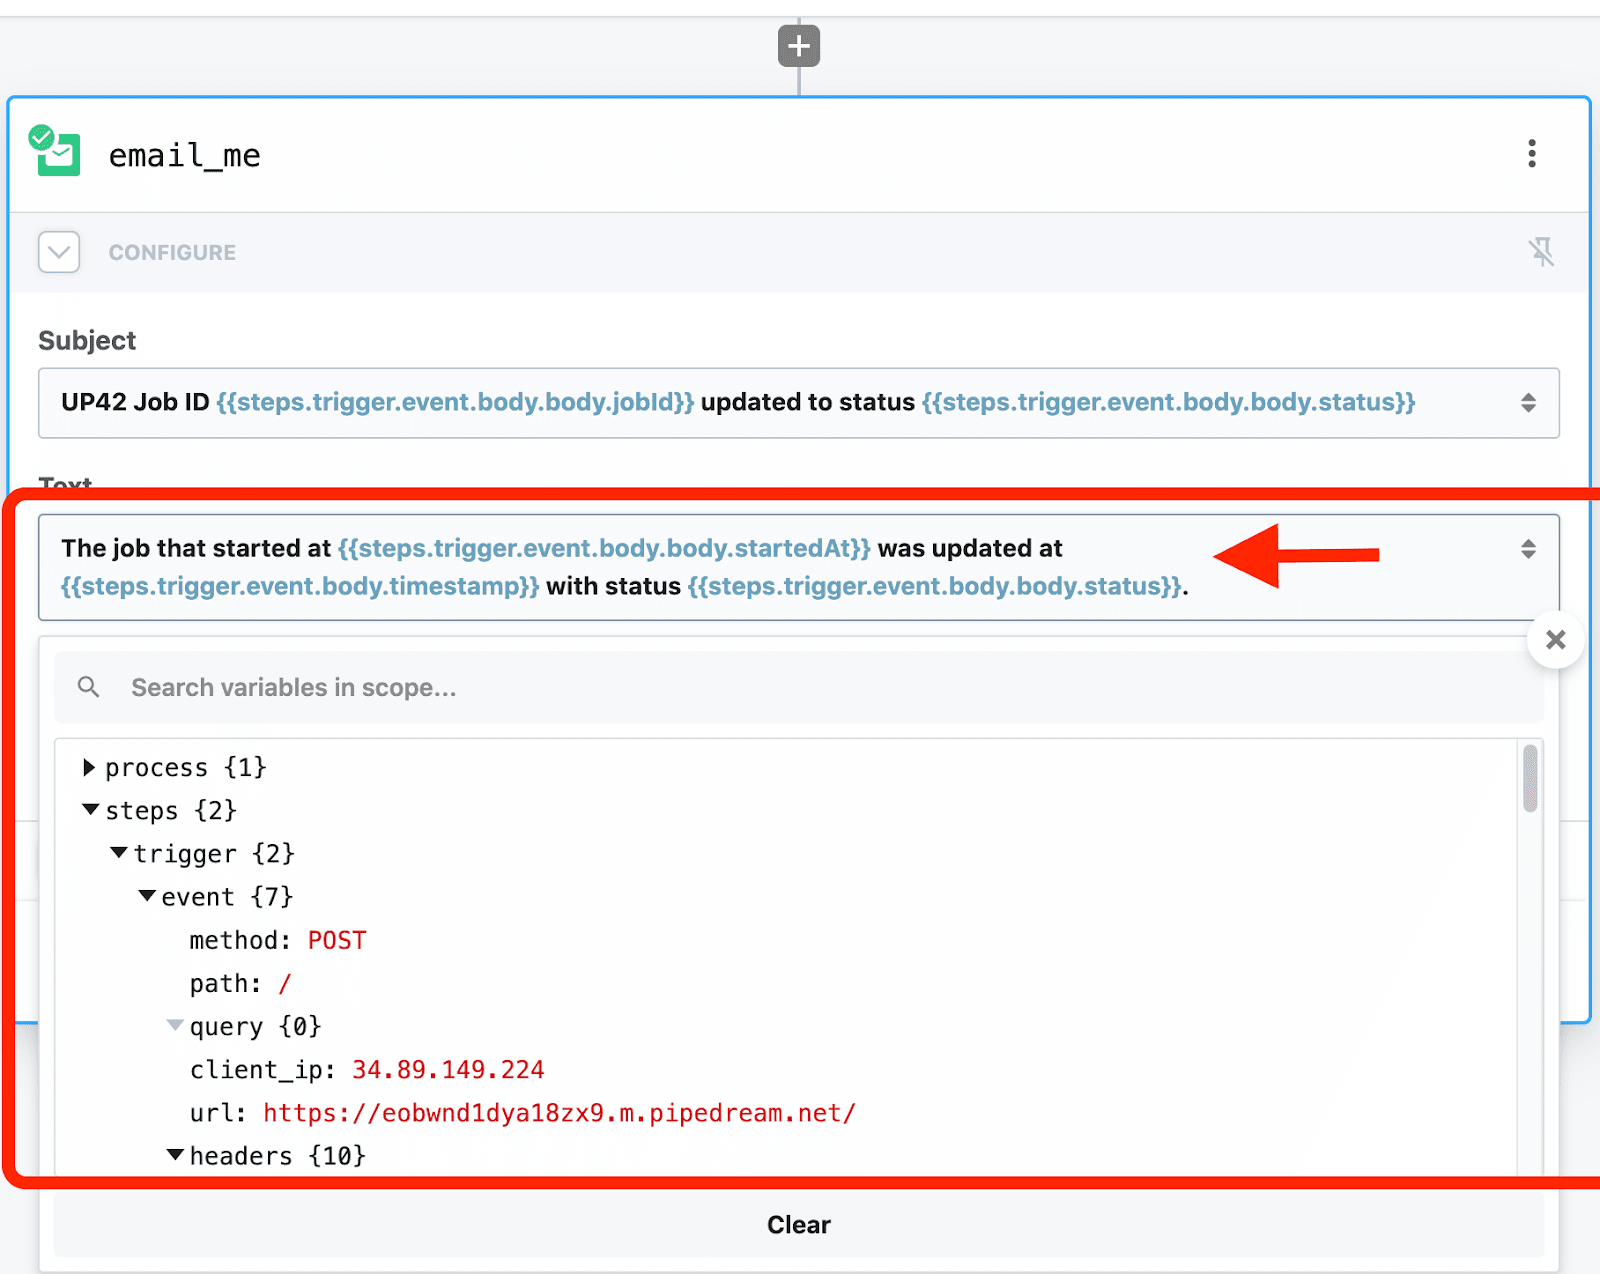
Adding the message body
The final subject and body:

Complete message subject and body
Adding the secret as an environment variable
We have added all the necessary steps to the Pipedream workflow. We're just missing the environment variable for the secret, so that the request (signature) validation can be done.
To add the secret, we need to go into the Pipedream account https://Pipedream.com/settings/account and add an environment variable.
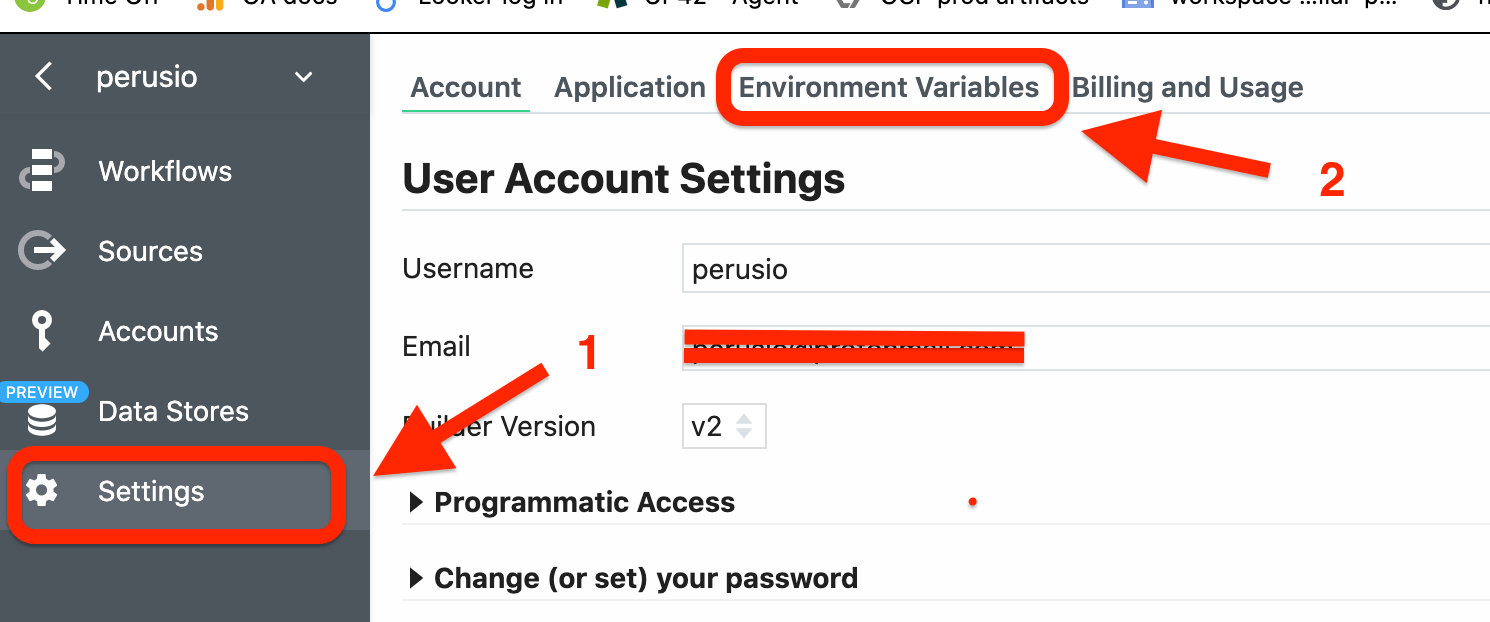
Environment variables in Pipedream account settings
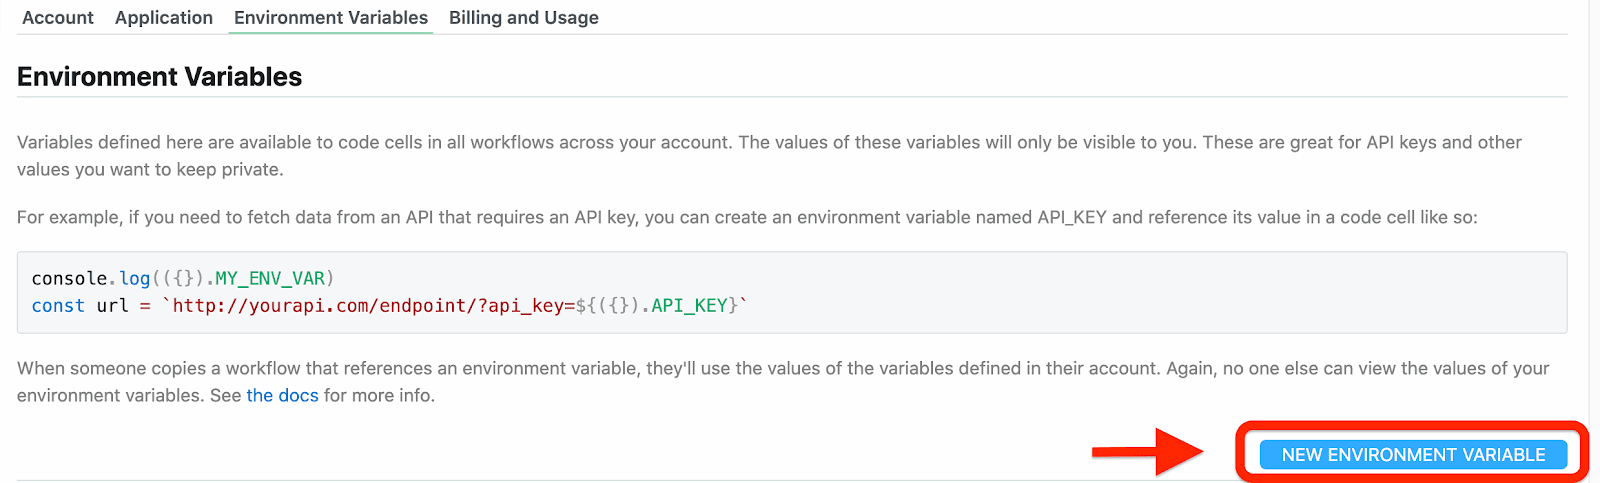
Adding environment variables
We then add the up42_webhook_secret environment variable. The value is the value we set when we created the webhook above.
the quick fox jumped over the lazy dog
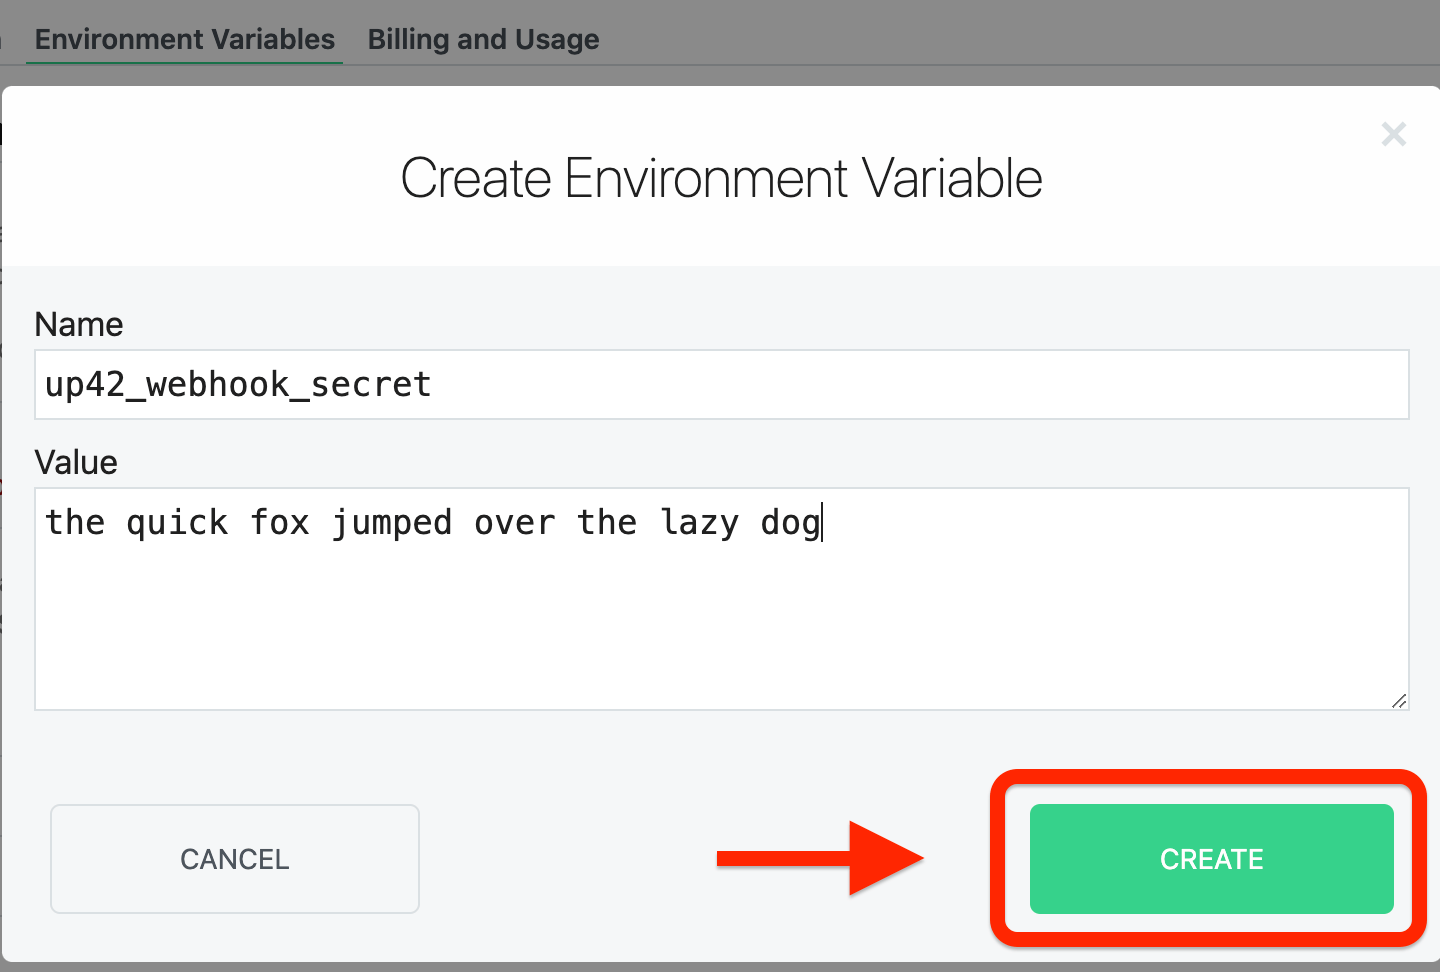
Adding the UP42 webhook secret
Adding a testing flag as an environment variable
Similarly, we add the test flag is_test with a value of yes for us to
test the setup end to end, independently of any status filtering.

Adding the testing flag as an environment variable
Testing the full workflow
Everything is in place to test out setup end to end, from webhook to email notification. To do that, we go back to the UP42 console and select the test option from the webhook dropdown menu:

Test a webhook on the UP42 console
And then select the Send Test Event button:

Sending a test event for the webhook
Moving on to our Pipedream workflow, we should have received the event.
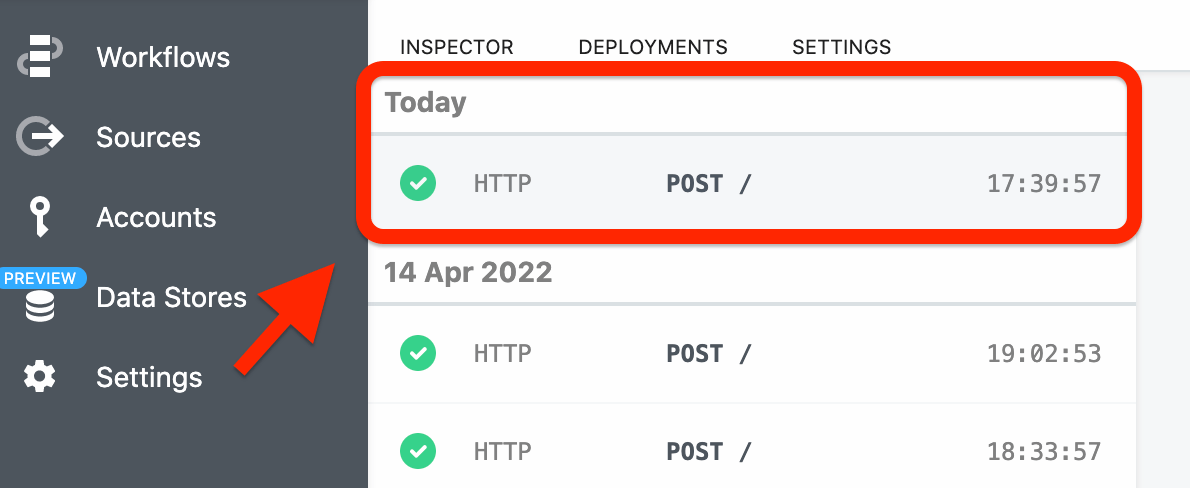
Incoming HTTP request for our webhook
And since we are in test mode we are not filtering any status. So the workflow is successful.
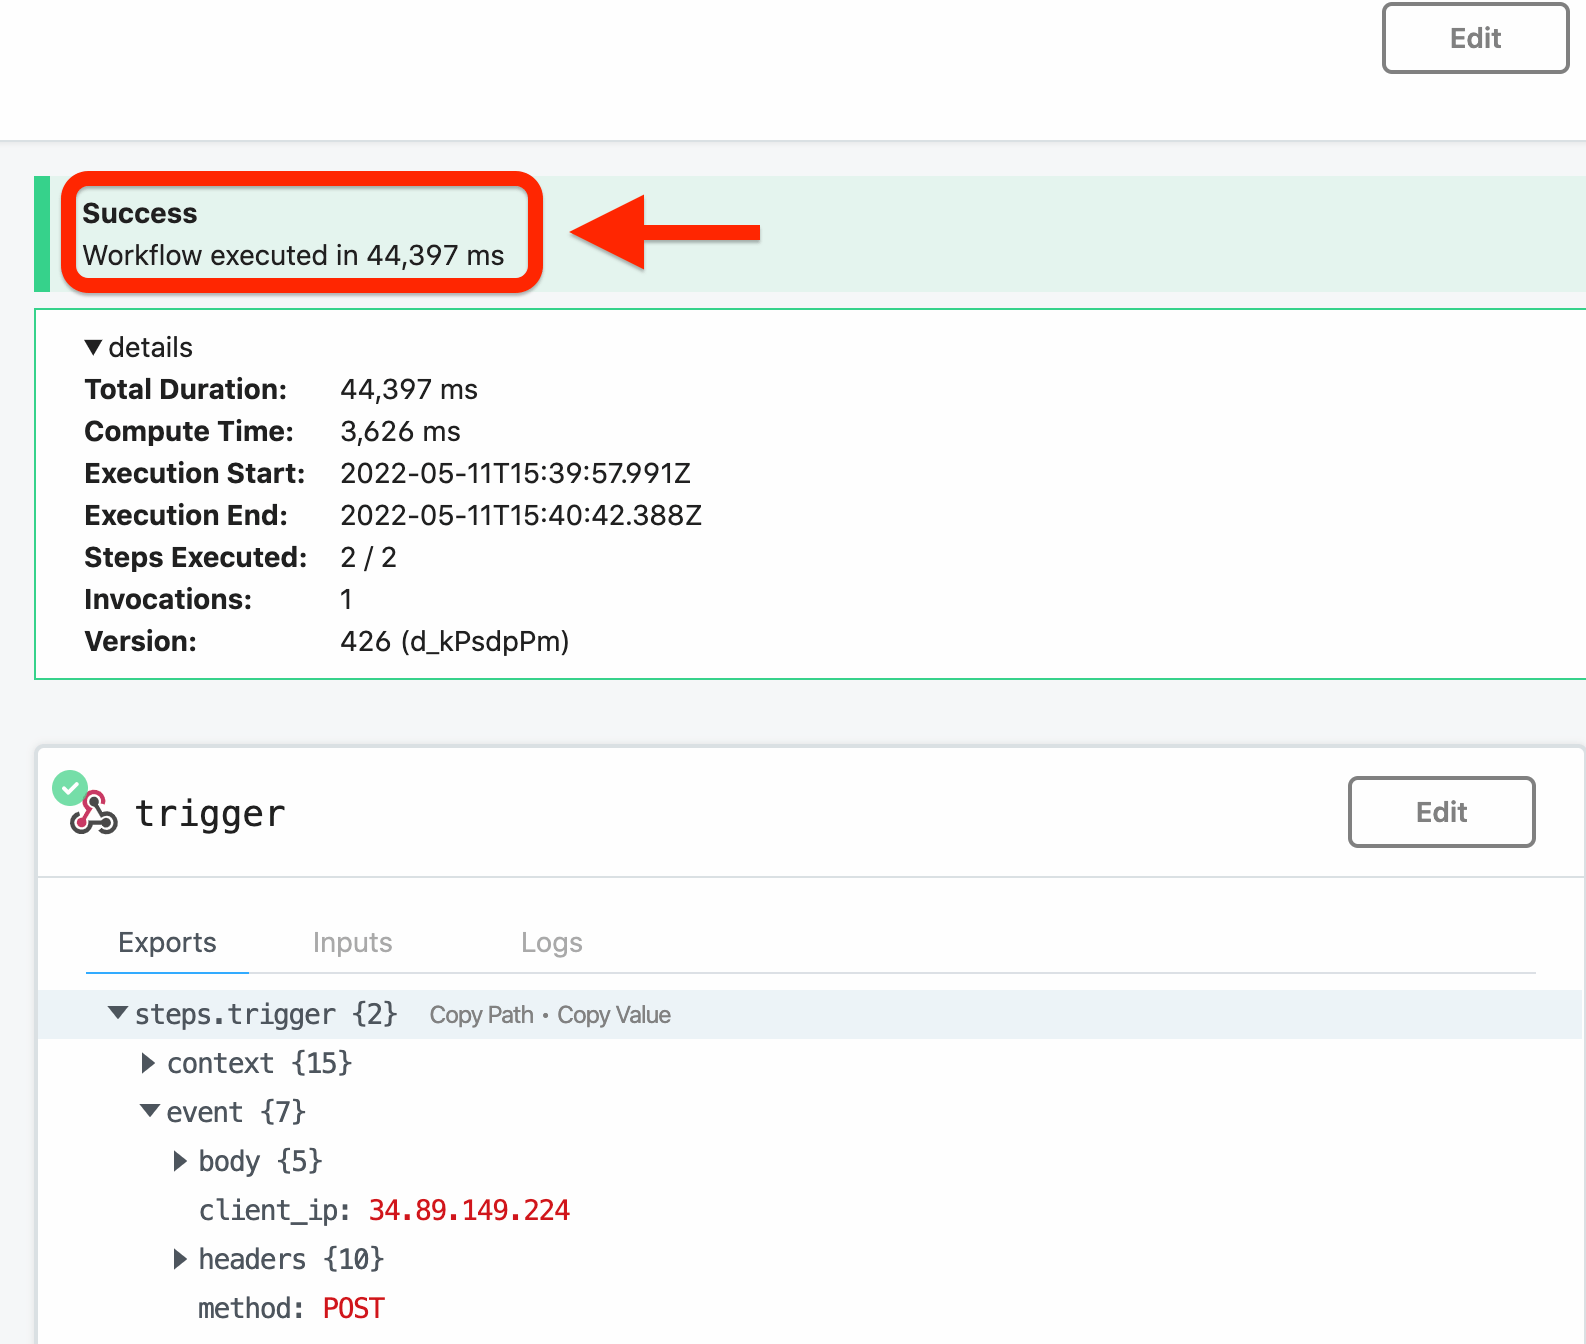
Successful workflow for webhook test event (in test mode: no status filtering)
And finally the email notification we wanted:

Successful email notification for a job status update
Placing an order and getting notified
Now that we have tested the setup, let us move on to running it for
real. The first thing we need to do is enforce the job status filtering.
For that to happen, we need to either delete or set to "no" the
is_test environment variable in Pipedream. We choose the latter,
setting it to the string "no".
All the above setup was to get notified of job statuses. Since we are first going to test a notification for an order, we need to create a webhook trigger like we did before and then follow the custom Python code step.
We copy the code from the repository and paste it into the text area.
And we add the email me action to the workflow as the final step.
Go back to the console and select an AOI for placing an order. We'll choosea small area in the city of Kiruna in northern Sweden, where the Swedish Institute for Space Physics is based.
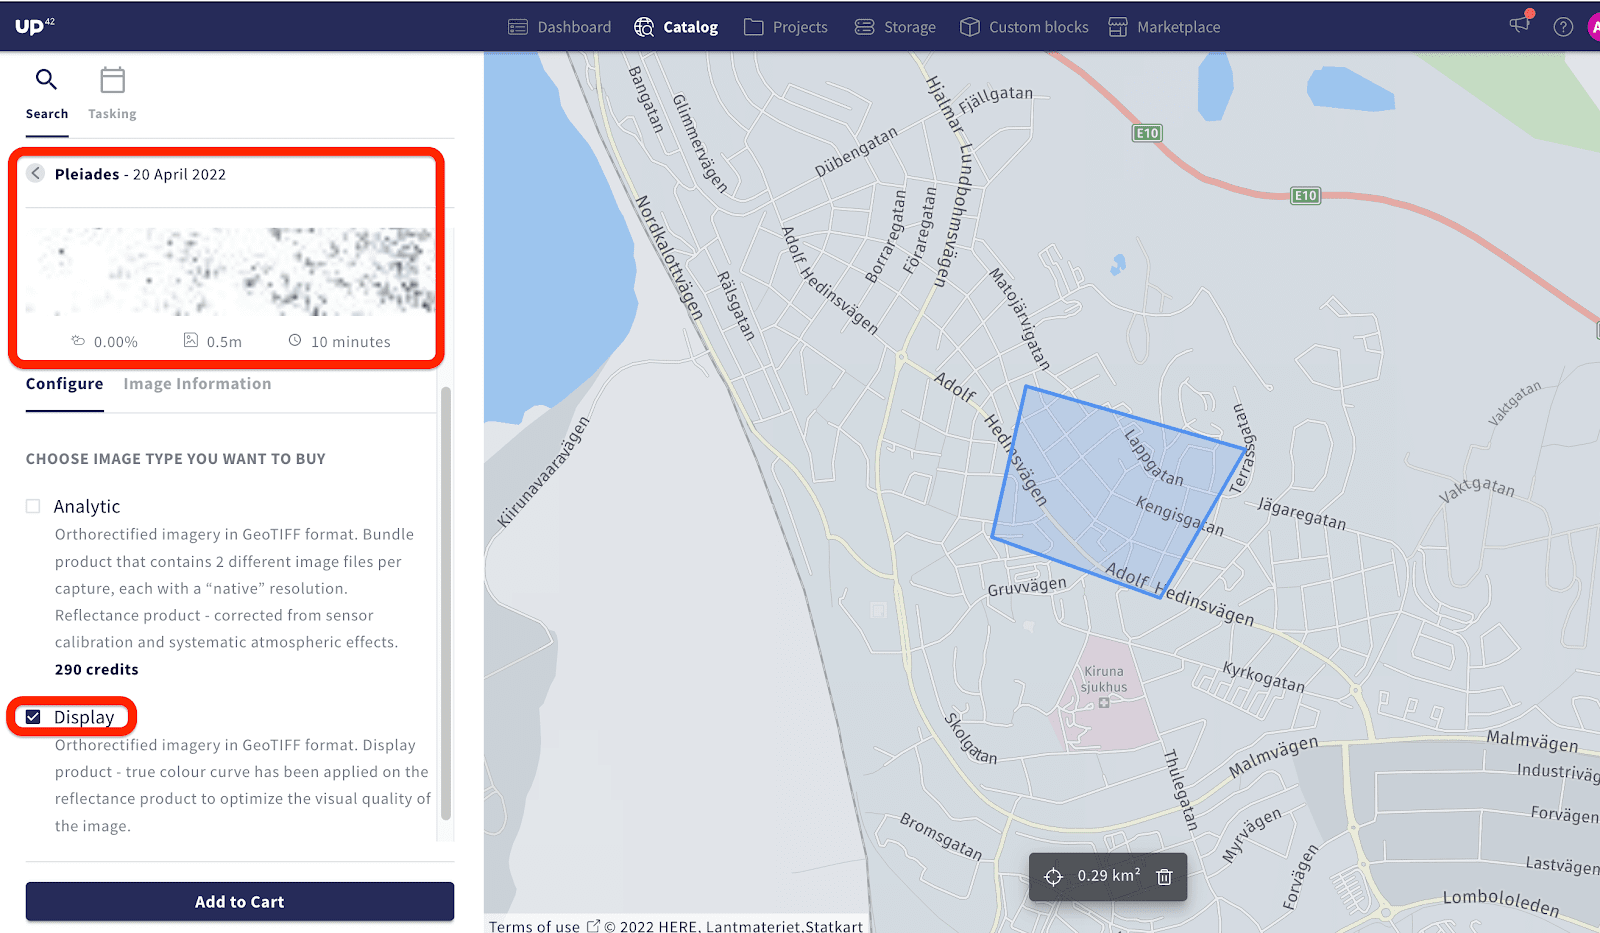
Ordering an image on the UP42 catalog
And once the order is delivered, here is the corresponding notification:
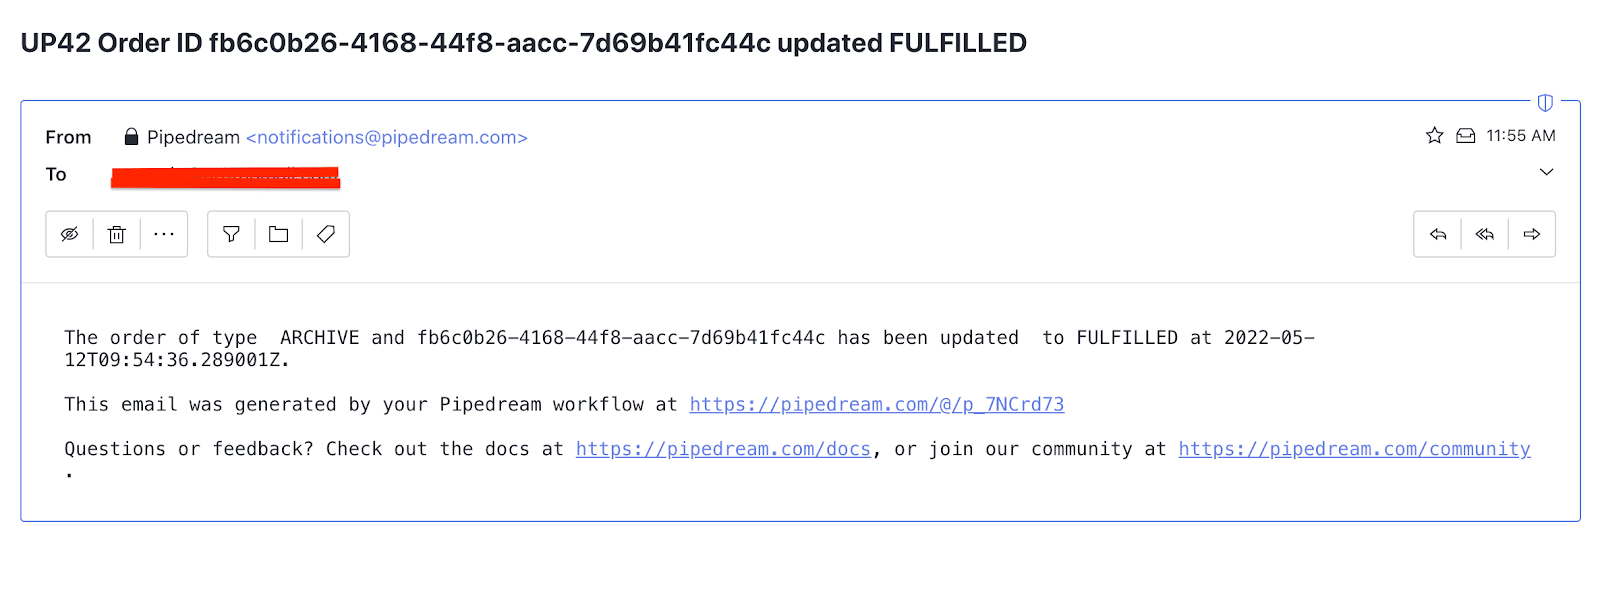
Order fulfilled email notification
Running a job and getting notified
We now come to the final example. We want to run a processing from storage with the image we ordered above. The workflow uses the building detector algorithm to detect buildings on the image we ordered in the previous section.
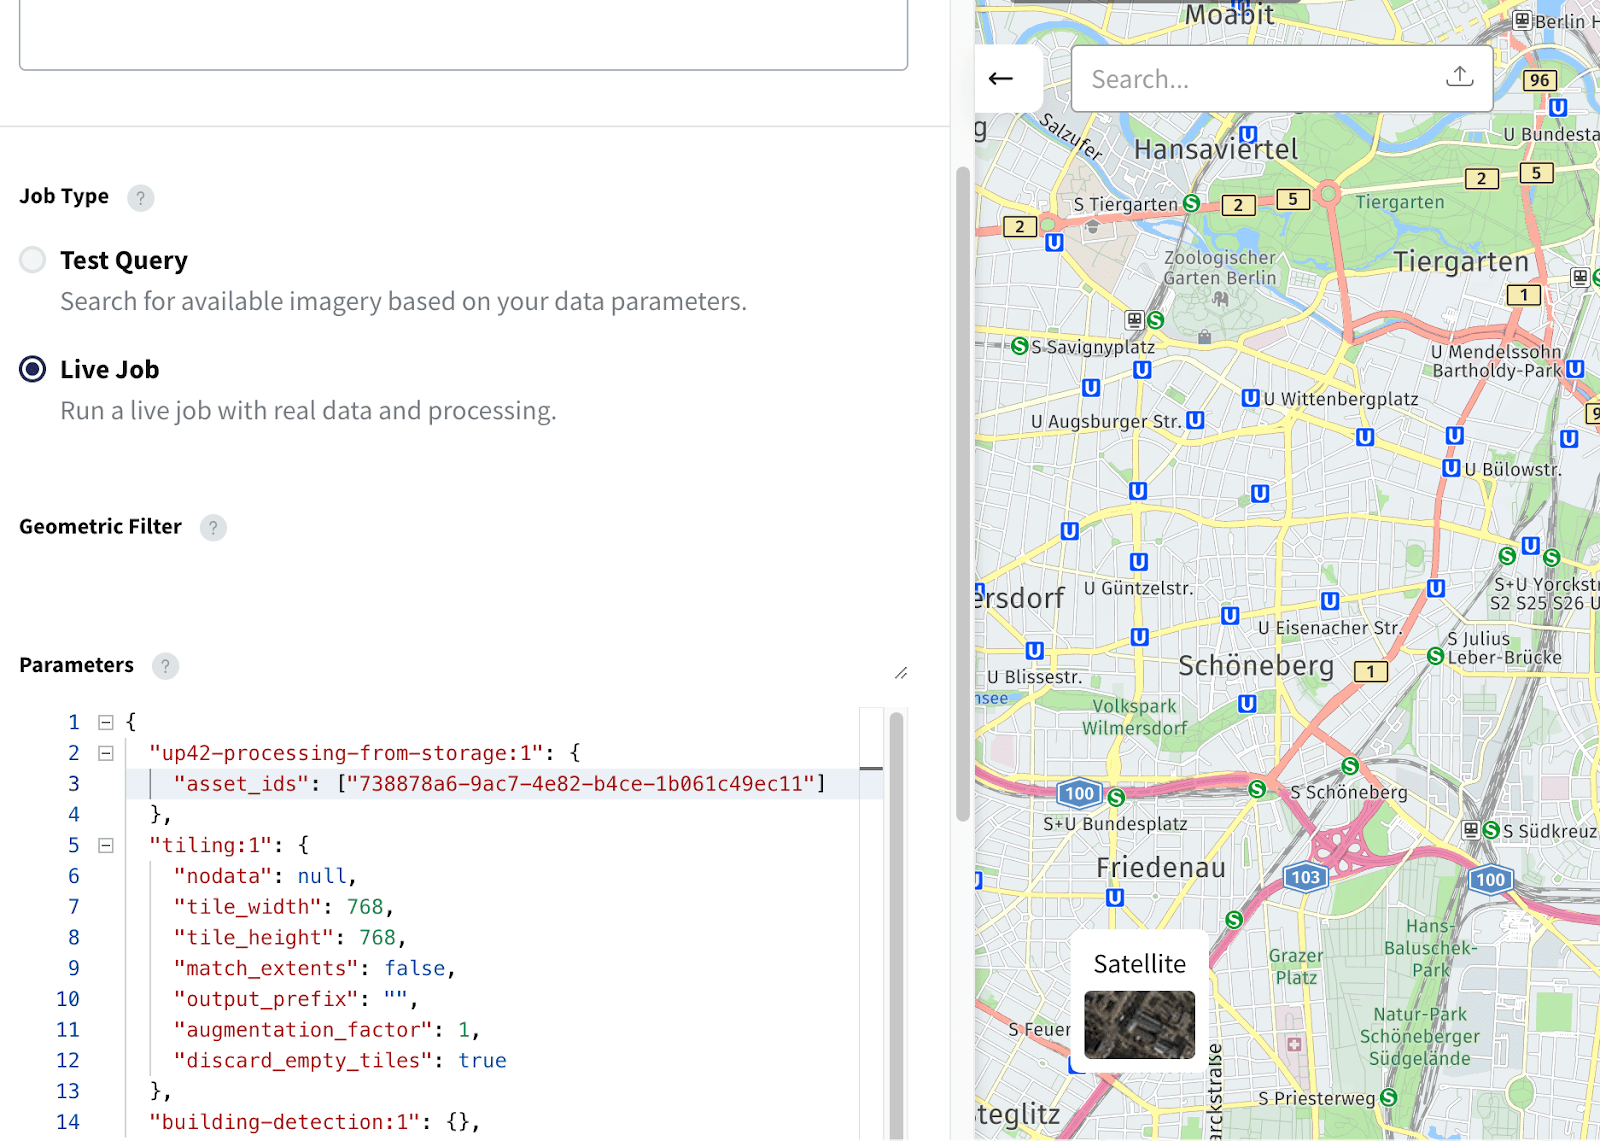
Building detector job configuration
When the job succeeds, we receive the notification:
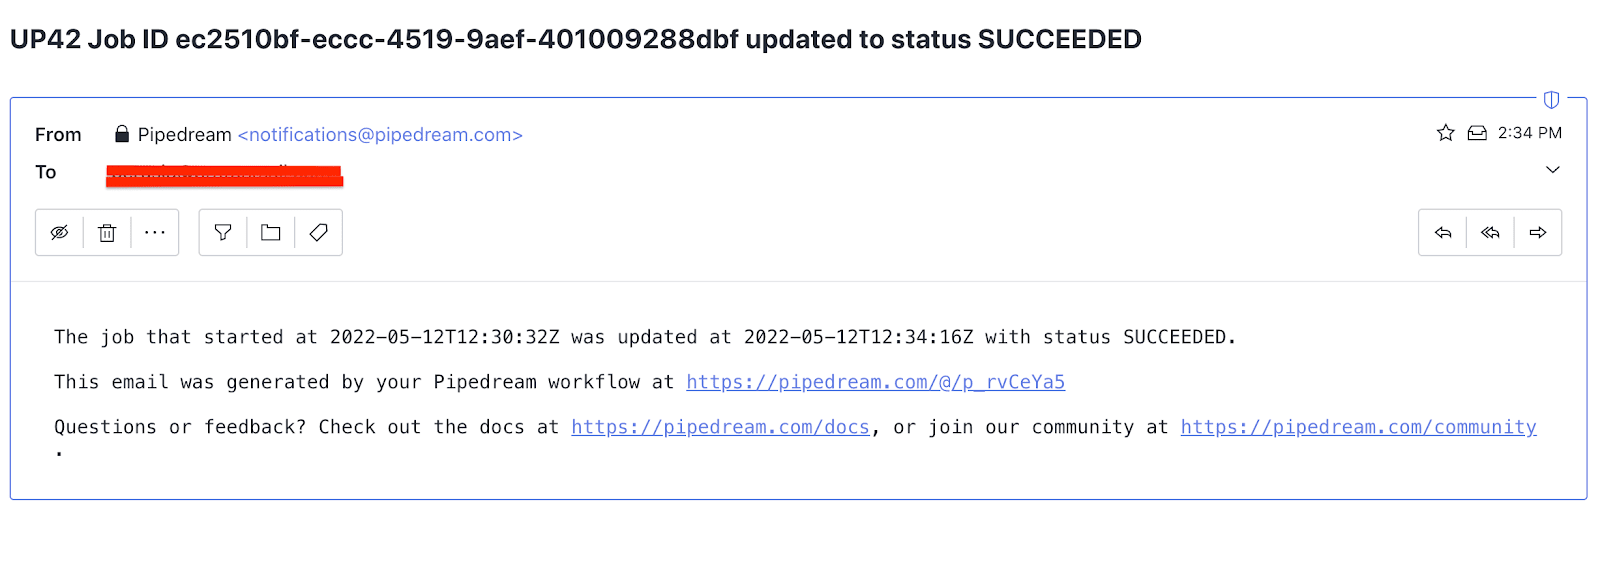
Job succeeded notification
Conclusions
Webhooks provide a way to create all sorts of automations and service integrations with UP42 with relative ease. What previously required you to poll the UP42 API willnow be delivered to the endpoint(s) of your choice. You do not need to run an HTTP server on your own to take advantage of webhooks. By using a service like Pipedream, you can deploy arbitrary code snippets in Python to handle the webhook requests. Further conditions like filtering for specific jobs, workflows, or orders is possible. This gives us a large degree of control over the chattiness of our notifications and/or automations.
Next in this series
The next article builds heavily on this one. Instead of using the console for managing webhooks, we'll use the API. Also, we'll run an HTTP server on our own instead of relying on a service like Pipedream. This will also allow us to meander into what could be understood as modern Python programming, while relying on language features that were recently introduced, and modern libraries.
Image credits
Kiruna, Sweden photo by Alexander Cahlenstein on PxHere.


