


In this article, we continue to expand on webhooks with UP42. We'll use Pipedream, but instead of using email to get the notifications delivered to us, we'll rely on ngrok to create a tunnel to an instance of OpenResty running on our development machine. This machine can be a server you have running on your Local Area Network (LAN) or your own personal software development laptop. The goals are to:
- Find an alternative notification channel to email, which is already an overloaded communication channel.
- Test and deploy a local web server setup that, if you decide, can be made available on the web.
Our OpenResty instance will use a modest amount of Lua to implement an interaction method with the UP42 webhooks.
Last but not least, we'll use the UP42 SDK to manage our UP42 webhooks.
Strategies to read this article efficiently
Sections of the article that are not essential are marked with [optional] in front of the section title. These are sections that you can skip on a first read-through and return to later. The remaining sections provide you with all that you need to successfully run the code associated with this article and thus locally deploy a server that receives UP42 webhooks.
Requirements
-
Reasonable fluency with programming in Python 3.
-
A Pipedream account: there are several ways to create an account. One of the easiest options is to authorize the application in your Github account. Your github identity would then be used throughout Pipedream.
-
A ngrok account: similar to pipedream, there are several waysto create an account. Connecting it to your Github account is one of the easiest ways to get started.
-
Minimal knowledge of Linux containers in general and Docker in particular.
-
If you know a little Lua it will help you better understand how the OpenResty component of the presented solution works: end to end. Alternatively you can just use it as is and instead focus on understanding the overall solution. If you want to modify the provided Lua code, you can always revisit the article later.
Installation
Before proceeding we need to clone the repository:
git clone https://github.com/up42/up42-webhooks.gitBe sure to satisfy the requirements.
Now we proceed to set up OpenResty.
Setting up OpenResty locally
A very brief introduction to nginx, OpenResty and Lua [optional]
This section gives some context for nginx and OpenResty. If you're just looking for the recipe on how to run this code, then you can skip it.
OpenResty is a distribution of nginx built around incorporating the nginx Lua module and a set of utilities and libraries that enable nginx to turn into an application server by embedding Lua into nginx. Lua is a small but feature rich programming language that is used in all manners of applications, with a strong focus in embedded environments and devices like set-top boxes, smart TVs, etc.
There are several implementations of Lua, the main two being:
-
reference implementation 5.x from PUC-Rio the creators of Lua. Sometimes designated as PUC Lua.
-
LuaJIT based in Lua 5.1, providing a Just in_Time tracing compiler. This significantly accelerates Lua as can be seen in these benchmarks (JIT) of LuaJIT against PUC Lua.
The nginx Lua module uses LuaJIT. Besides the JIT functionalities, LuaJIT also provides a Foreign Function Interface (FFI) that allows one to easily embed C libraries into Lua, i.e., without the need to deal with the Lua C API.
Coming from Python, you can think of the LuaJIT FFI library as the LuaJIT equivalent of Python's ctypes module.
The goal of this article is not to delve deeply into how nginx and OpenResty work. But here's a brief description, if you're curious.
-
nginx works with a single master and several worker processes. The first is responsible for handling configuration changes and keeping the worker processes running. All requests are handled by the worker processes.
-
When processing a request, nginx goes through multiple phases.
-
The nginx Lua module runs a LuaJIT VM inside each worker process. This means that, as a rule-of-thumb, Lua code is not shared across workers, unless it is explicitly set to be so. We'll come back to this point later.
-
In order to share data across workers, nginx uses shared memory. This is also what OpenResty uses to share code and data across workers.
-
The nginx configuration relies on the concept of contexts. Contexts organize the configuration into a hierarchy that goes from global (
main) to increasing levels of locality, e.g.,http,server,location,location-if. -
Declaration of shared memory zone can only happen at the http
levelfor the nginx Lua module.
These notions will allow us to better understand the OpenResty configuration and the corresponding Lua code inside it.
A little bit of OpenResty configuration [optional]
Let us now have a look at the nginx configuration.
Http context
## For storing webhooks only allow POST requests.
map $request_method $not_allowed_method {
  POST 0;
  default 1;
}

## Path to the up42webhooks Lua module.
lua_package_path '$prefix/lua/?.lua;;';

## Define the shared dictionary where you will store the webhooks sent payloads.
lua_shared_dict received_webhooks 3m;

## Disable nginx/openresty version info.
server_tokens off;
At the http context we have 3 directives.
-
A map directive that specifies that only
POSTrequests will return a1. All other methods take the default value of0. This allows us to specify that further down, in thelocationcontext that handles the incoming HTTP requests (webhook notifications), only acceptsPOSTrequests. -
The second directive defines the Lua module package path, where OpenResty will look for Lua modules. We add the path to
up42webhooks.lua. -
We define a Lua dictionary to be stored in the nginx shared menory zone with a size of 3 MB.
-
Finally we turn off the server tokens to not disclose any server version information.
## HTTP
server {
  listen 80;

  # Return a made up name for the server.
  header_filter_by_lua_block {
    ngx.header['server'] = 'LeRenard2000';
  }
Now let us look at the server context.
-
Listen on IPv4 sockets for
0.0.0.0:80(inside the container). -
Modify the Server header so that we do not disclose which HTTP server technology we are using. This is achieved via the header_filter_by_lua_block directive. This setting is inherited at the lower level contexts like
location, provided that it is not explicitly set there.
  location / {
    root /usr/local/openresty/nginx/html;
    index index.html index.htm;
  }

  ## Get rid of the log polluting favicon.ico 404 error.
  location = /favicon.ico {
    root /usr/local/openresty/nginx/html;
    try_files /favicon.ico =204;
  }

  location /receive-webhooks {
    default_type application/json;

    ## Only POST is allowed here.
    if ($not_allowed_method) {
      return 405 '{"code": 405, "msg": "method not allowed"}';
    }

    # Store the received payload in the shared dict.
    content_by_lua_block {
      -- Get the custom Lua module we created.
      local m = require 'up42webhooks'
      ngx.say(m.set_key_value_webhook())
      ngx.exit(ngx.OK)
    }
  }

  ## List all webhooks that have been received and stored.
  location /dump-webhooks {
    default_type application/json;

    content_by_lua_block {
      local m = require 'up42webhooks'
      m.dump_webhooks()
      m.dump_cardinality()
      ngx.exit(ngx.OK)
    }
  }

  # Ping location to find out if the server is up and running.
  location ~* /ping {
    default_type text/plain;
    return 200 'PONG';
  }
}
Finally at the location and location-if contexts we have:
-
Default location
/uses the OpenResty supplied homepage. -
/receive-webhookslocation has as default MIME typeapplication/jsonand any request that is not aPOSTgets returned a 405 status code with the corresponding JSON formatted error message. The function of this location is to receive the webhooks notifications and store the request body in a shared dictionary that is integer-indexed. -
/dump-webhooksis similar toreceive-webhooks, but instead of storing data, it retrieves the received webhooks from the shared dictionary. -
/pingAs a convenience to assess if the OpenResty instance is up & running, we set up a specific location that is case-insensitive and returns the status code 200 (OK) and the textPONG. This location is used by the pipedream-based HTTP webhook forwarder to test for the availability of the server before trying to forward any webhook. More on this aspect below.
Let us briefly test the configuration by asking for a ping.
curl -si http://localhost:9888/ping

HTTP/1.1 200 OK
Date: Tue, 26 Jul 2022 23:28:37 GMT
Content-Type: text/plain
Content-Length: 4
Connection: keep-alive
server: LeRenard2000

PONG
As expected we got back the text PONG as a response.
Let us test for a GET request in /receive-webhooks with the output
piped to jq:
curl -s http://localhost:9888/receive-webhooks | jq .

{
  "code": 405,
  "msg": "method not allowed"
}
As expected we got a 405 Method not allowed response.
Finally let us inspect the logs for the /ping request:
make logs | awk  '$0 ~ "GET /ping" {print}'

172.17.0.1 - - [26/Jul/2022:23:28:37 +0000] "GET /ping HTTP/1.1" 200 4 "-" "curl/7.84.0"
We see the ping request. Everything seems to be working in terms of the OpenResty server.
Launching our OpenResty instance
After cloning the repository and making sure that the requirements are met, we can now launch OpenResty. To do so, we issue the command:
make runThis makes the target do the following:
-
Fetch the OpenResty docker image based on Alpine Linux, if it’s not already present in your cache of container images.
-
Bind mount the
openresty/default.confOpenResty configuration file from the host to/etc/nginx/conf.d/default.confin the container. -
Bind mount the
openresty/luadirectory that contains the Lua module to handle UP42 webhooks from the host to/usr/local/openresty/nginx/luato the container. -
Publish port
80from the container, mapped to port9888in the host.
If you don't have this image available locally, it will be fetched from dockerhub after which it will run the container in the background (detached).
If you now list the running containers, you should be able to see the container up and running.
make listThe output should be something like:
docker ps -f "publish=9888"
CONTAINER ID   IMAGE                        COMMAND                  CREATED        STATUS        PORTS                  NAMES
dabc3e07cc95   openresty/openresty:alpine   "/usr/local/openrest…"   26 hours ago   Up 26 hours   0.0.0.0:9888->80/tcp   hardcore_matsumot
Of course the container ID and name will differ, as well as the uptime.
Let us see if OpenResty is running, serving HTTP requests on port
9888.
Pointing the browser to: https://localhost:9888 we should get the
default OpenResty homepage:
 OpenResty homepage
We can also alternatively use cURL to test if the OpenResty homepage is available by sending a HEAD request:
curl -sI http://localhost:9888

HTTP/1.1 200 OK
Date: Tue, 26 Jul 2022 16:11:46 GMT
Content-Type: text/html
Content-Length: 1097
Last-Modified: Thu, 30 Jun 2022 16:30:45 GMT
Connection: keep-alive
ETag: "62bdcfb5-449"
server: LeRenard2000
Accept-Ranges: bytes
We see that OpenResty is up and running.
A little bit of Lua to keep a record of the webhook notifications [optional]
The Lua module is pretty standard in how is currently set up to define modules. The module is sandboxed, in the sense that the module code has no access to the global environment and therefore prevents any unwanted side effects.
--- Module for working with UP42 webhooks in OpenResty.
-- @module up42webhooks.lua
-- @author António Almeida <[email protected]>
-- @copyright UP42 GmbH
-- @license MIT
-- @alias M

--- Some local definitions.
local ipairs = ipairs
-- String functions.
local format = string.format
-- Math functions.
local max = math.max
-- nginx Lua functions and constants.
local ngx = ngx
local rcvd = ngx.shared.received_webhooks

-- Avoid polluting the global environment.
-- No globals beyond this point.
-- If we are in Lua 5.1 this function exists.
if _G.setfenv then
   setfenv(1, {})
else -- Lua >= 5.2.
   _ENV = nil
end

--- Module table.
local M = { _VERSION = '1.0',
            _NAME = 'up42webhooks',
            _DESCRIPTION = 'Handling webhooks for UP42 in OpenResty' }

-- Define a variable to be used in a closure below.
local counter = 0

-- Increment the counter and return it.
function M.inc()
   counter = counter + 1
   return counter
end

-- Decrement the counter and return it.
function M.dec()
   counter = max(counter - 1, 0)
   return counter
end

-- Return a string stating the success or failure of storing the data.
function M.set_key_value_webhook()
   -- Read the request body.
   ngx.req.read_body()
   local data = ngx.req.get_body_data()

   local ok, err, forced
   -- If nginx read data from the request body, then return it and add
   -- the value of counter to be used as a key.
   if data then
      M.inc()
      ok, err, forced = rcvd:set(counter, data)
   end

   if ok then
      return format('{"msg": "value with key %d stored"}', counter)
   else
      -- Decrement the counter if there is an issue with the dict so
      -- that we always have consecutive keys.
      M.dec()
      return format('{"msg": "%s"}', err)
   end
end

-- Represents the total number of webhooks.
local total_number_webhooks = 0

-- Dumps all the webhooks that have been stored.
-- Side effects only. No return.
function M.dump_webhooks()
   -- Get all the keys for the shared dict.
   local keys = rcvd:get_keys()
   -- Iterate over them. Assuming no key is nil.
   for _, k in ipairs(keys) do
      ngx.say(rcvd:get(k))
   end
   -- Set the total number of webhooks. It needs to be retrieved from
   -- the keys available in the dict to persist.
   total_number_webhooks = #keys
end

-- Prints the total number of items in the shared dict.
function M.dump_cardinality()
   return ngx.say(format('{"number_webhooks_received": %d}', total_number_webhooks))
end

-- Return the module table.
return M
The most salient fact is the usage of a closure (also called an
upvalue in Lua parlance) for
the variable counter. This variable keeps track of the current index
value for the shared dictionary we are using to store the received
webhooks. This counter gets incremented and decremented, via the
functions inc and dec respectively.
The other two functions implement a setter and a getter for the
shared dictionary, i.e., set_key_value_webhook stores a webhook and
dump_webhooks iterates over all the stored values amd retrieves them.
These two functions only produce side effects, since they instruct
OpenResty to pretty print some text as their final lines of code.
Setting up ngrok
Now that we have our OpenResty instance locally running, let us make it available on the Internet.
ngrok is an application that allows you to expose a server/service behind a firewall/NAT to the internet. The basic concept is illustrated below with this graphic taken from the ngrok 1.x github repository README.
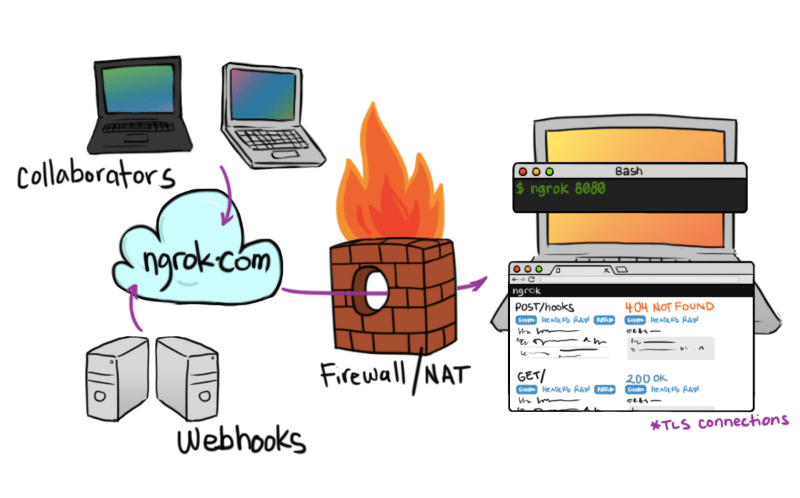
Quoting from the same README in What is ngrok useful for?
[...] Developing any services which consume webhooks (HTTP callbacks) by allowing you to replay those requests [...]
Which is precisely what we are aiming for.
Creating an account and installing ngrok
In order to use ngrok we need first to sign up for it.
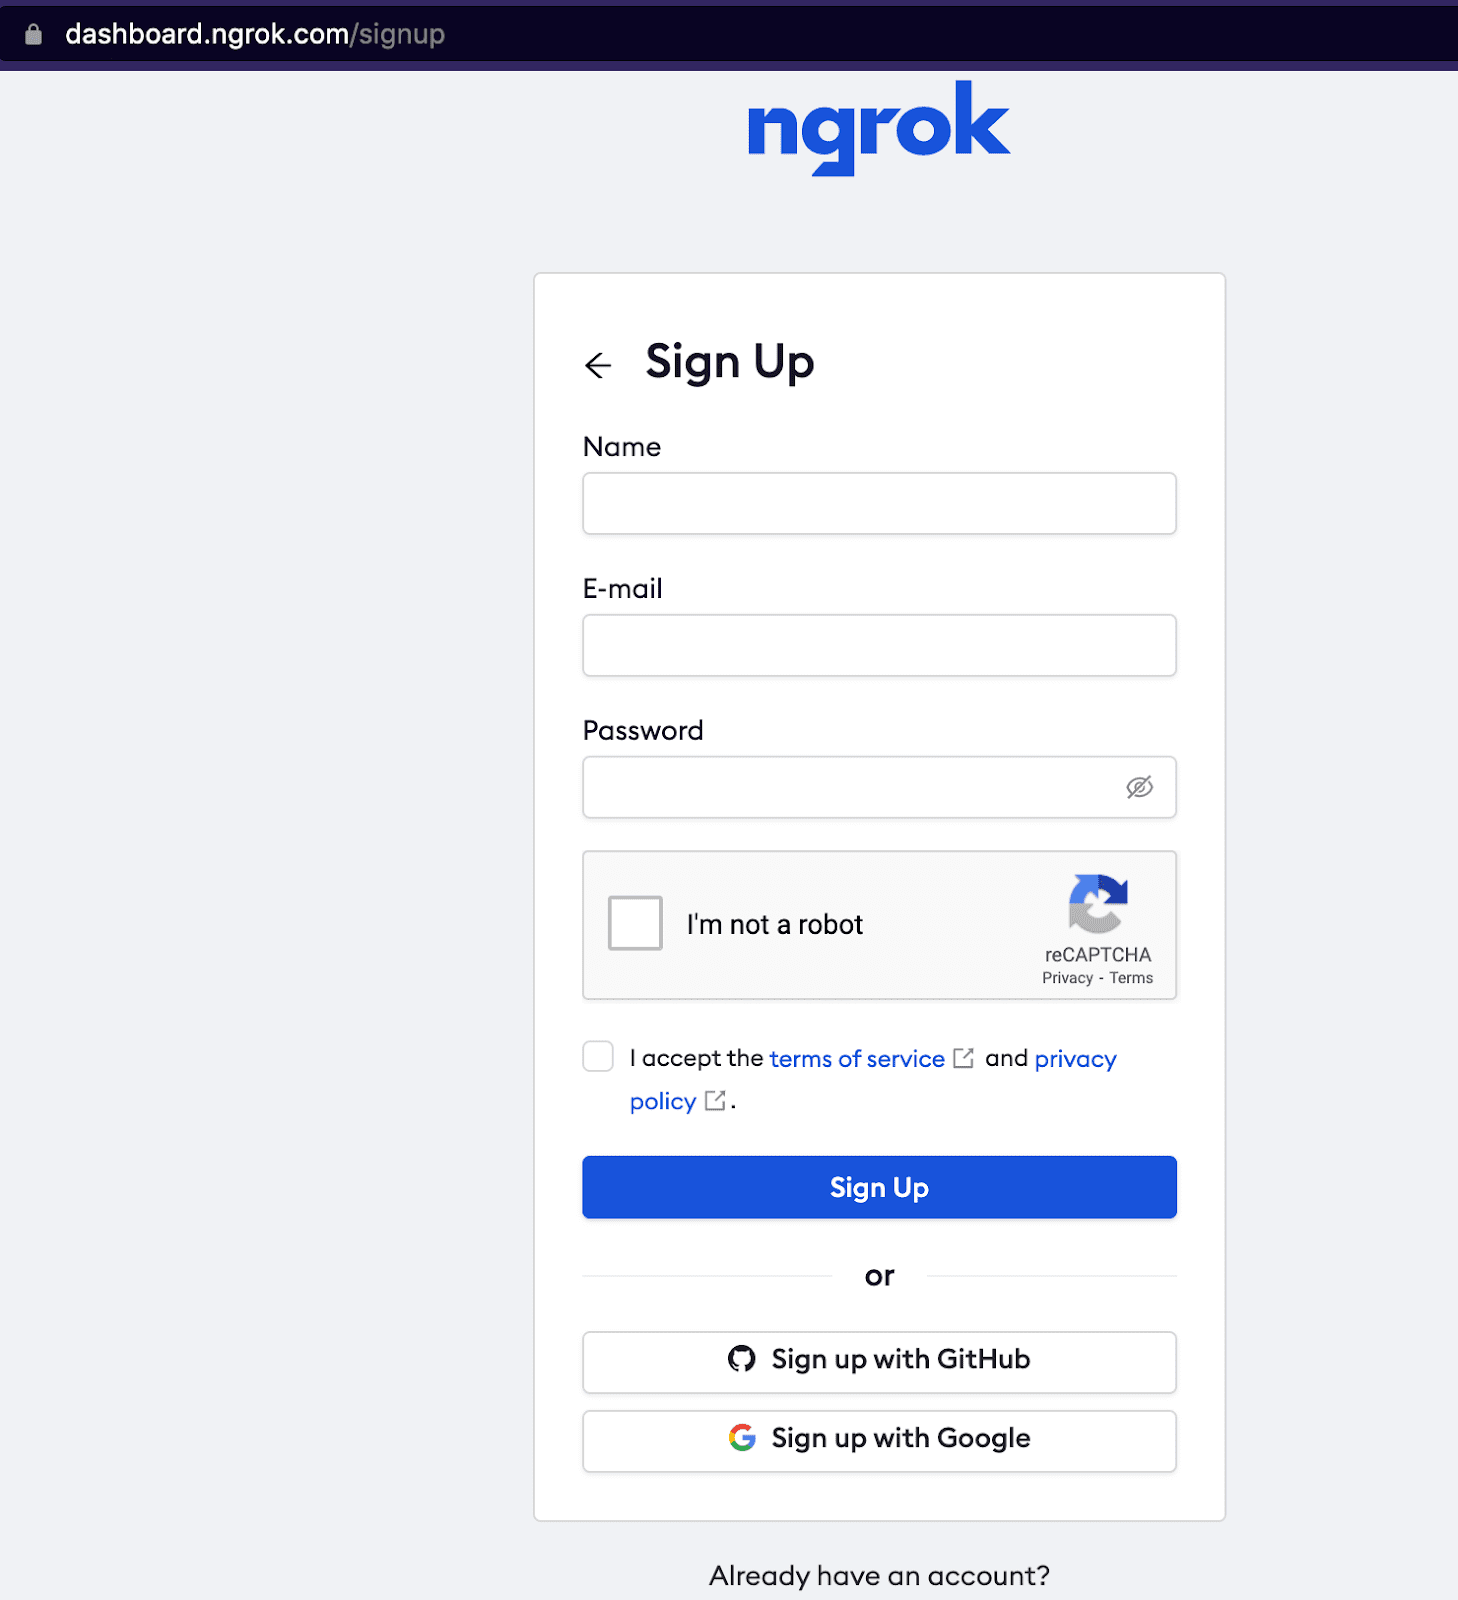
There are multiple options available. The easiest is probably just authorizing the ngrok application in your Github account.
Once that is done. We are presented with versions of the ngrok agent for the major operating systems. If you use brew you can just do:
brew install ngrokOnce installed, you need to authenticate with the ngrok API. To do so, just copy the line as below where an authtoken is given.

We can now check if your ngrok configuration is correct with:
ngrok config check

Valid configuration file at /Users/appa/Library/Application Support/ngrok/ngrok.yml
The exact location of the configuration file ngrok.yml will vary
with operating system. In this case, we're running ngrok on macOS.
Creating a tunnel from the ngrok server to our OpenResty instance
The only thing missing for us to do with ngrok is setting up the connection between the ngrok site and our local OpenResty instance.
-
ngrokwill create an HTTP host (think of it as a proxy) that terminates the TLS connections. -
ngrokwill create a secure tunnel from their service to our local OpenResty instance. -
The connection is initiated from the client side, enabling it to cross a firewall/NAT.
-
To provide a minimal level of security we are going to set up our ngrok proxy with Basic Authentication.
To establish the connection we do:
ngrok http --basic-auth='<username>:<password>' http://localhost:9888Where:
username: username for the basic authentication.password: password for the basic authentication.
At the end we put the address of the local OpenResty instance. On
localhost, port 9888.
Once launched, the terminal is taken over by ngrok and you should
have a console view of the currently running tunnel.
You can run a quick diagnostic on the tunnel.
ngrok diagnose

Testing ngrok connectivity...

Internet Connectivity
  Name Resolution                           [ OK ]
  TCP                                       [ OK ]
  TLS                                       [ OK ]
Ngrok Connectivity
  Name Resolution                           [ OK ]
  TCP                                       [ OK ]
  TLS                                       [ OK ]
  Tunnel Protocol                           [ OK ]

Successfully established ngrok connection! (region: 'eu', latency: 20.112553ms)
Additionally, ngrok provides both an API and a web interface. When running on the console, the URL for the web interface is displayed.
Session Status                online
Account                       António Almeida (Plan: Free)
Version                       3.0.6
Region                        Europe (eu)
Latency                       20ms
Web Interface                 http://127.0.0.1:4040
In this case it is running on localhost, port 4040.
We can obtain a similar output using the API with cURL (just for the last request):
curl -s http://localhost:4040/api/requests/http?limit=1 | jq .Returning, in our case:
{
  "uri": "/api/requests/http",
  "requests": [
    {
      "uri": "/api/requests/http/airt_2CRcILgw0YwmPQ1LJOnBvJd0h4w",
      "id": "airt_2CRcILgw0YwmPQ1LJOnBvJd0h4w",
      "tunnel_name": "command_line",
      "remote_addr": "18.208.145.230",
      "start": "2022-07-25T19:05:56+02:00",
      "duration": 3968975,
      "request": {
        "method": "GET",
        "proto": "HTTP/1.1",
        "headers": {
          "Accept": [
            "*/*"
          ],
          "Accept-Encoding": [
            "gzip, deflate"
          ],
          "Authorization": [
            "Basic d2h1c2VyOmZ1Y2hzaWExMw=="
          ],
          "Host": [
            "f7c5-95-90-234-147.eu.ngrok.io"
          ],
          "User-Agent": [
            "python-httpx/0.23.0"
          ],
          "X-Forwarded-For": [
            "18.208.145.230"
          ],
          "X-Forwarded-Proto": [
            "https"
          ]
        },
        "uri": "/ping",
        "raw": "R0VUIC9waW5nIEhUVFAvMS4xDQpIb3N0OiBmN2M1LTk1LTkwLTIzNC0xNDcuZXUubmdyb2suaW8NClVzZXItQWdlbnQ6IHB5dGhvbi1odHRweC8wLjIzLjANCkFjY2VwdDogKi8qDQpBY2NlcHQtRW5jb2Rpbmc6IGd6aXAsIGRlZmxhdGUNCkF1dGhvcml6YXRpb246IEJhc2ljIGQyaDFjMlZ5T21aMVkyaHphV0V4TXc9PQ0KWC1Gb3J3YXJkZWQtRm9yOiAxOC4yMDguMTQ1LjIzMA0KWC1Gb3J3YXJkZWQtUHJvdG86IGh0dHBzDQoNCg=="
      },
      "response": {
        "status": "200 OK",
        "status_code": 200,
        "proto": "HTTP/1.1",
        "headers": {
          "Connection": [
            "keep-alive"
          ],
          "Content-Length": [
            "4"
          ],
          "Content-Type": [
            "text/plain"
          ],
          "Date": [
            "Mon, 25 Jul 2022 17:05:56 GMT"
          ],
          "Server": [
            "LeRenard2000"
          ]
        },
        "raw": "SFRUUC8xLjEgMjAwIE9LDQpEYXRlOiBNb24sIDI1IEp1bCAyMDIyIDE3OjA1OjU2IEdNVA0KQ29udGVudC1UeXBlOiB0ZXh0L3BsYWluDQpDb250ZW50LUxlbmd0aDogNA0KQ29ubmVjdGlvbjoga2VlcC1hbGl2ZQ0Kc2VydmVyOiBMZVJlbmFyZDIwMDANCg0KUE9ORw=="
      }
    }
  ]
}
Using jq you can easily filter on the provided response to obtain
specific details. Of course, if you haven't received
any request in your ngrok instance, then this response will be empty.
Now that we have set up ngrok, let us proceed to setting up pipedream.
Setting up pipedream
In the previous article, we explained in detail how to set up a pipedream workflow. Building on that explanation, we'll now set up a workflow for the local OpenResty instance that we just launched.
Set up of the required pipedream workflow and environment variables
First, we need to create a workflow that has three steps:
- HTTP Trigger: webhook receiving pipedream endpoint.
- Validation: validate the request using the provided signature (HMAC).
- Forward the request: if valid and the server is reachable, then POST the webhook via ngrok to the local OpenResty instance.
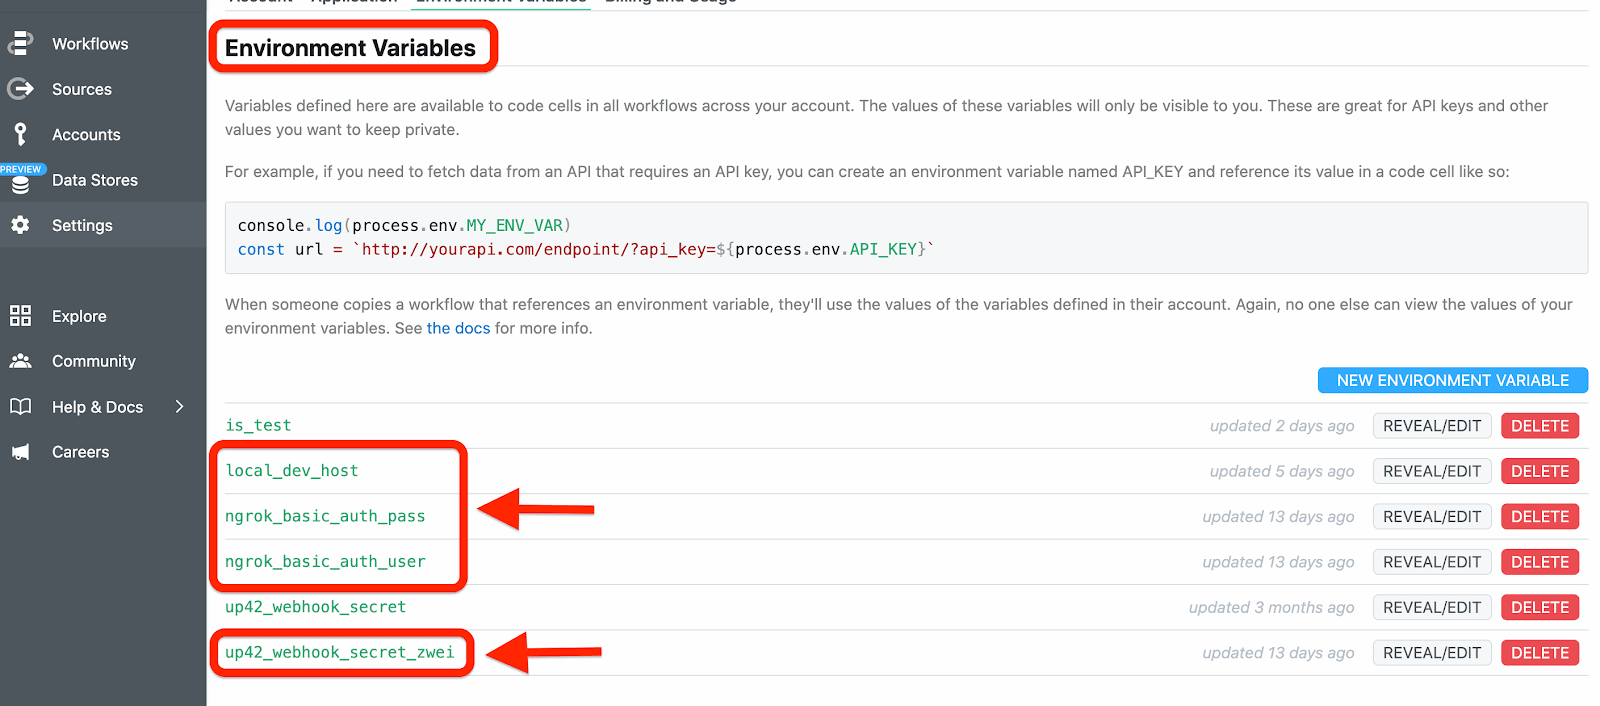
We need to set up the environment variables for:
local_dev_host: ngrok host address.ngrok_basic_auth_pass: the username for the ngrok Basic Authentication setup.ngrok_basic_auth_pass: the password for the ngrok Basic Authentication setup.up42_webhook_secret_zwei: the secret for this particular webhook.
Pipedream handling of webhooks
Our Python code snippet to validate the webhook request is available
on the file validate_webhook.py under the snippets directory in
the
repository.
# Code snippet to use with pipedream.com to validate an incoming
# request (a webhook) from UP42 for job and order statuses updates. It
# acts based on the statuses we are interested in. All the
# information is available and can be passed on to other steps in a
# workflow.

from pipedream.script_helpers import (steps, export)

import os
import re
import base64
from hmac import digest, compare_digest
from hashlib import sha256
from time import time

# Get the response headers.
response_headers = steps["trigger"]["event"]["headers"]

# Get the signature input.
sig_input = steps["trigger"]["event"]["headers"]["signature-input"]

# Get the signature.
sig_header_value = steps["trigger"]["event"]["headers"]["signature"]
sig_header_value = bytes(sig_header_value.split("=", 1)[1], "UTF-8")

# Extract signature timestamp given as UNIX time.
sig_ts_re = re.compile("created=(?P<sig_ts>\d{10,20})")
sig_ts_val = int(sig_ts_re.search(sig_input).groupdict()["sig_ts"])

# Get current date as UNIX time.
current_ts = int(time())

# Reduce the possibility of replay attacks by dropping any incoming request that
# is older than 5 minutes (300 seconds).
if os.environ.get("is_test") != "yes":
    assert sig_ts_val <= current_ts and abs(current_ts - sig_ts_val) < 300, f"Request time skew is too large."

# Extract how the signature is generated.
# 1. Look for the up42-sig element in the header.
field_re = re.compile("up42-sig=\((?P<sig_list>.*)\);.*")
sig_val = field_re.search(sig_input).groupdict()["sig_list"]
# 2. Extract the list of signature input components.
list_re = re.compile("[^\"\s]+")
sig_inputs = re.findall(list_re, sig_val)

# Validate the received request by validating the signature.
# 1. First get each signature component concatenated in a single string.
sig_str = "".join(response_headers[i] for i in sig_inputs)
# 2. Compute the HMAC for this string.
secret = os.environ["up42_webhook_secret_zwei"] # get the secret
computed_sig = base64.b64encode(digest(bytes(secret,  "UTF-8"), bytes(sig_str, "UTF-8"), sha256))

Raise an Assertion error if the signature is invalid.
assert compare_digest(sig_header_value, computed_sig),  "Cannot authenticate incoming HTTP request."

# Filter the response based on the job status we are interested in.
def filter_response_status(current_status: str, interesting_statuses: list[str]) -> bool:
    if os.environ.get("is_test") == "yes":
        return True
    assert current_status in interesting_statuses, f"Ignoring request. Ignored status {current_status}."

# Get the current event type.
current_event_type = steps["trigger"]["event"]["body"]["event"]

# The list of statuses that we are interested in for bot jobs and orders.
notifiable_statuses = ["ERROR", "FAILED", "CANCELLED", "SUCCEEDED"] + ["FAILED PERMANENTLY", "FULFILLED"]

# Filter the response based on the statuses we are interested in.
filter_response_status(steps["trigger"]["event"]["body"]["body"]["status"], notifiable_statuses)
We already explained how the request validation works. The only noteworthy difference is that this snippet works for both jobs and order status-related webhooks. In the first article, we had two separate webhooks. Here we can just browse the OpenResty saved webhooks so we can filter them locally.
Pipedream HTTP client to forward webhooks to ngrok
After validating the webhook, the next step is forwarding the received
webhook request to our OpenResty instance through ngrok. The Python
code snippet below takes care of that. It is available on the file
httpx_client_ngrok.py under the snippets directory in the
repository.
# Simple HTTP client to forward a webhook to our development server
# running locally.  It receives the webhook body from the previous
# step that validates the webhook.

# pipedream serialized objects.
from pipedream.script_helpers import (steps, export)

import os

from contextlib import suppress
# httpx and friends.
import httpx
from httpx_auth import Basic

def get_url(u):
    """Return the local development url.

    """
    return f"{os.environ['local_dev_host']}{u}"

# The user and password for the ngrok basic authentication
# are set as pipedream environment variables.
ngrok_basic_auth = Basic(os.environ["ngrok_basic_auth_user"], os.environ["ngrok_basic_auth_pass"])

# Test that the local server is up and running.
r = httpx.get(get_url("/ping"), auth=ngrok_basic_auth)
# If we get the proper response proceed.
assert r.status_code == 200 and r.text == "PONG", f"{os.environ['local_dev_host']} is not reachable."

# Issue the POST request in the given context.
with httpx.Client() as client:
    try:
        r = client.post(get_url("/receive-webhooks"), auth=ngrok_basic_auth, json=steps["trigger"]["event"]["body"])
        # Raise an exception for any non 2XX status code.
        r.raise_for_status()
    except httpx.HTTPStatusError as exc:
        print(f"Error {exc.response.status_code} while requesting {exc.request.url!r}.")
    except httpx.HTTPError as exc:
        print(f"Error while requesting {exc.request.url!r}.")

    # Return the response body. Continue to returning None even is
    # there is a value error, e..g, response is not JSON.
    with suppress(ValueError):
        export("ngrok_response", r.json())
We use the httpx Python HTTP library to create a simple client application that does two things:
- Check if the server is reachable by issuing a GET
/pingrequest. - If reachable, then POST the webhook received by pipedream to our server instance through ngrok.
We use
suppress
to suppress the ValueError exception when the response status to the
POST request has a non-2XX status code and the response body is not in
JSON format.
Since we are using pipedream environment variables, we need to access
the os.environ dictionary to retrieve the request host and the basic
authentication credentials.
In the event of the server being unreachable, we raise an AssertionError exception and exit the workflow.
Setting up the SDK to manage webhooks
In the previous article we used the UP42 console to manage webhooks, now we'll use the [UP42 SDK](create](https://sdk.up42.com/webhooks/).
It is all included in a Jupyter notebook available on the repository. It is properly commented. Please refer to it for usage of the SDK to manage webhooks in the context of this article.
Bear in mind that we are interacting with an already-created webhook. If you need to create a new one, you can use the SDK to do so. Please see the notebook for further details.
Bringing it all together
Now that we have the full setup in place, we can finally test it and receive webhooks on our local OpenResty instance.
Testing the webhook notification with OpenResty
We refer to the notebook for the purpose of testing the webhook we have setup.
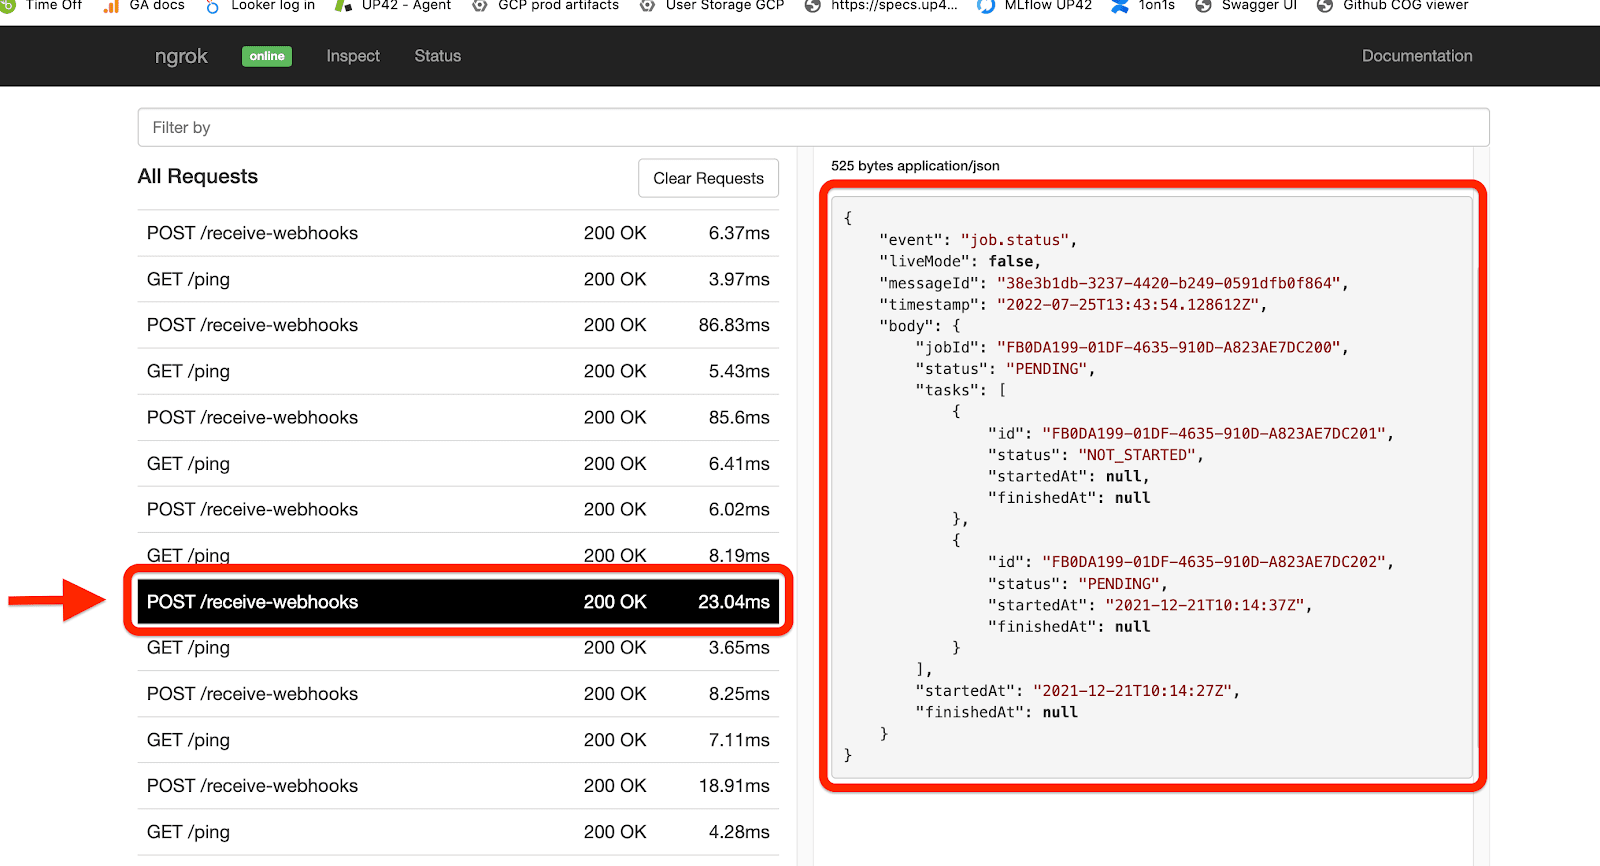
current_wh.trigger_test_events()Checking for test event in our OpenResty instance:
We know that test events have the field liveMode in the sent payload
set to false. Using jq to filter for that:
curl -s http://localhost:9888/dump-webhooks | jq '. | select(.liveMode == false)'Giving:
{
  "event": "job.status",
  "liveMode": false,
  "messageId": "b6743fe0-9a26-44e9-b7aa-304b740aca55",
  "timestamp": "2022-07-25T14:33:26.37709Z",
  "body": {
    "jobId": "FB0DA199-01DF-4635-910D-A823AE7DC200",
    "status": "PENDING",
    "tasks": [
      {
        "id": "FB0DA199-01DF-4635-910D-A823AE7DC201",
        "status": "NOT_STARTED",
        "startedAt": null,
        "finishedAt": null
      },
      {
        "id": "FB0DA199-01DF-4635-910D-A823AE7DC202",
        "status": "PENDING",
        "startedAt": "2021-12-21T10:14:37Z",
        "finishedAt": null
      }
    ],
    "startedAt": "2021-12-21T10:14:27Z",
    "finishedAt": null
  }
}
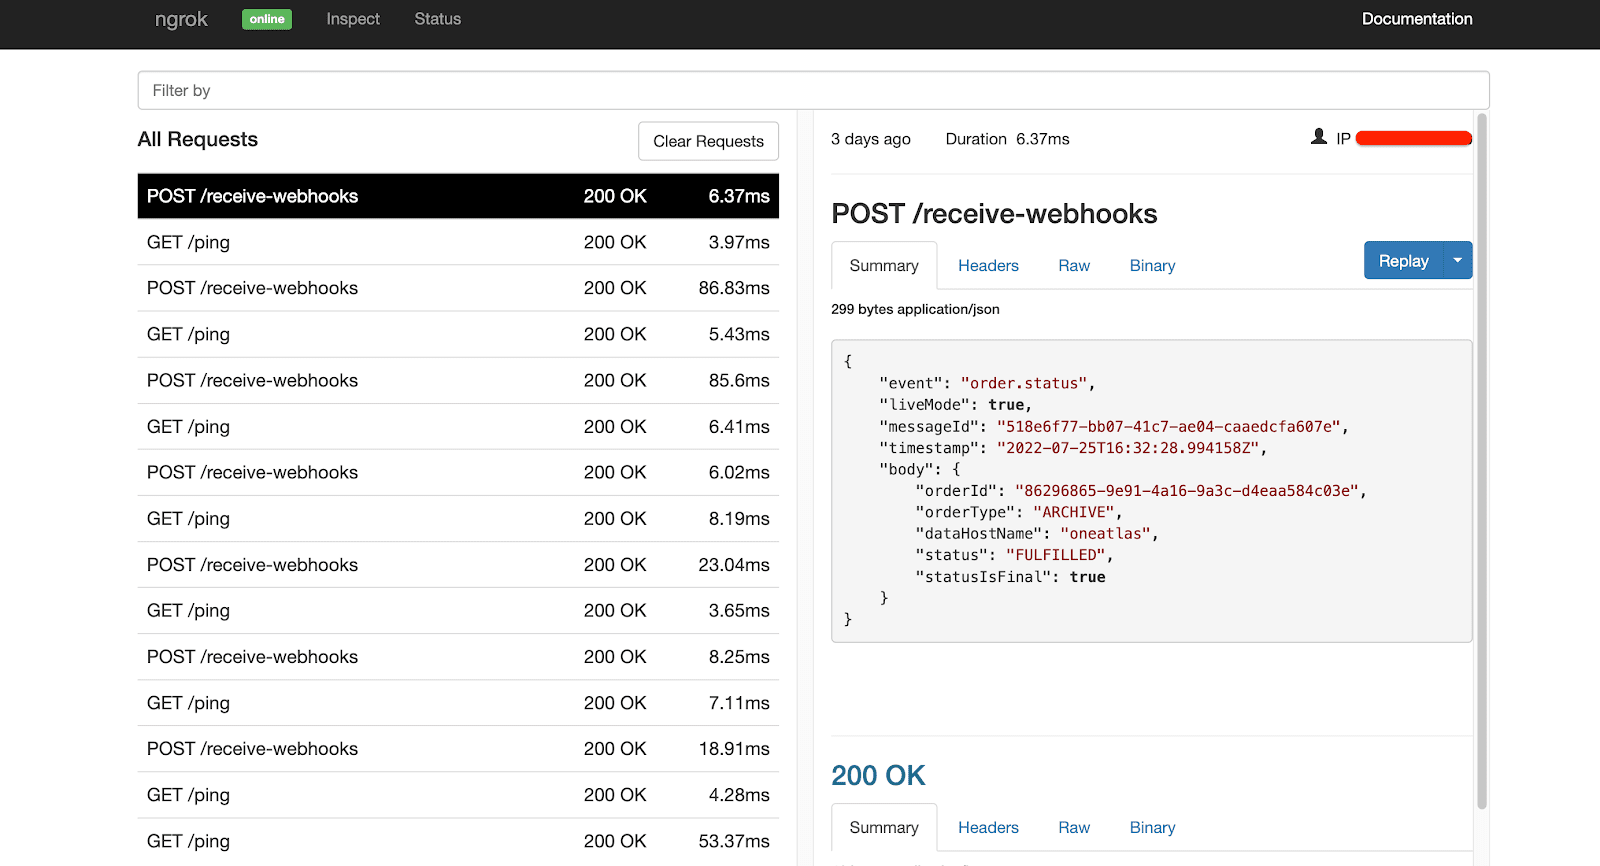
We see our test event. Similarly, if we looked in the ngrok web UI:
Launching a job and getting notified locally
Our webhook is valid for both job and order status changes. Let us start with a job notification. Recalling that our interest is only on the job related statuses:
["ERROR", "FAILED", "CANCELLED", "SUCCEEDED"]Lauching a job. We can look for the webhook notification after some time:
curl -s http://localhost:9888/dump-webhooks | jq 'select(.liveMode == true and .event == "job.status")'with the response:
{
  "event": "job.status",
  "liveMode": true,
  "messageId": "258270de-58f8-42da-aea6-e7a07d2667f7",
  "timestamp": "2022-07-25T16:02:34Z",
  "body": {
    "id": "6dbe8956-b8c5-47b3-9f56-b1686628aa19",
    "status": "FAILED",
    "startedAt": "2022-07-25T15:59:00Z",
    "finishedAt": "2022-07-25T16:02:34Z",
    "tasks": [
      {
        "id": "f267fda9-818b-49eb-bd5b-c48d9fce160a",
        "status": "SUCCEEDED",
        "startedAt": "2022-07-25T15:59:10Z",
        "finishedAt": "2022-07-25T16:01:09Z",
        "logUrl": "https://api.up42.com/projects/21fe9f6d-99a2-49af-bafb-620a20740e26/jobs/6dbe8956-b8c5-47b3-9f56-b1686628aa19/tasks/f267fda9-818b-49eb-bd5b-c48d9fce160a/logs"
      },
      {
        "id": "d23c1a60-960e-4850-91f5-d66a09ee582c",
        "status": "CANCELLED",
        "startedAt": null,
        "finishedAt": null,
        "logUrl": "https://api.up42.com/projects/21fe9f6d-99a2-49af-bafb-620a20740e26/jobs/6dbe8956-b8c5-47b3-9f56-b1686628aa19/tasks/d23c1a60-960e-4850-91f5-d66a09ee582c/logs"
      },
      {
        "id": "b3a59b77-718f-4243-9d04-e313e286e47b",
        "status": "FAILED",
        "startedAt": "2022-07-25T16:01:20Z",
        "finishedAt": "2022-07-25T16:02:33Z",
        "logUrl": "https://api.up42.com/projects/21fe9f6d-99a2-49af-bafb-620a20740e26/jobs/6dbe8956-b8c5-47b3-9f56-b1686628aa19/tasks/b3a59b77-718f-4243-9d04-e313e286e47b/logs"
      }
    ]
  }
}
The workflow in question has 3 tasks and one of them fails. Thus
setting up the final job status as FAILED.
Placing an order and getting notified locally
Finally we test for an order statuses related webhook notifications.
curl -s http://localhost:9888/dump-webhooks | jq '. | select(.liveMode == true and .event == "order.status")'Returning:
{
  "event": "order.status",
  "liveMode": true,
  "messageId": "518e6f77-bb07-41c7-ae04-caaedcfa607e",
  "timestamp": "2022-07-25T16:32:28.994158Z",
  "body": {
    "orderId": "86296865-9e91-4a16-9a3c-d4eaa584c03e",
    "orderType": "ARCHIVE",
    "dataHostName": "oneatlas",
    "status": "FULFILLED",
    "statusIsFinal": true
  }
}
Thus we get that a webhook notification was delivered for an order
that was FULFILLED.
Conclusions

Certainly using OpenResty locally to get webhook based notifications is a more interesting experience than relying on email. It is more developer congenial and allows us to replay those requests. The setup presented here is one that we could deploy in a publicly accessible server on the Internet. It is then up to us to further develop this setup and leverage webhooks for other usages, like downloading assets associated with orders and/or launch jobs, or any other action available through the UP42 API.
The setup described here can be run locally on an ARM based Single Board Computer (SBC), e.g., a Raspberry Pi (RPi) or a Pine64. ARM based computers are usually quite energy efficient. There is no need to run a server in a public cloud. An OpenResty container image can be built for any of these architectures as described here. OpenResty and the Lua ecosystem is specially useful for low computational power ARM based devices like the ones enumerated before.
Image credits
Photo of the moon from aboard the ISS Expedition 30 (2012), NASA/ESA


